Social Media

Social Media

‏إظهار الرسائل ذات التسميات windows erreur. إظهار كافة الرسائل

الثلاثاء، 21 يناير 2020

8 CMD Commands to Manage Wireless Networks in Windows

[ad_1]


Affiliate Disclosure: By buying the products we recommend, you help keep the lights on at MakeUseOf. Read more.


As a Windows user, the Control Panel and the Settings app can feel quite limiting in what they can do. If you want full and absolute control over your network, meaning access to everything the operating system has to offer, then you’ll have to start using Command Prompt.

Never used Command Prompt before? Don’t worry. Using it is as simple as typing out the commands you’ll see below.

If you’re ready to continue, here are some of the most useful networking commands to know for managing and troubleshooting your home network.

1. PING

ping is one of the most basic yet useful network commands to utilize in the command prompt application. It tells you whether your computer can reach some destination IP address or domain name, and if it can, how long it takes data to travel there and back again.

Sample usage and output:

windows-command-ping

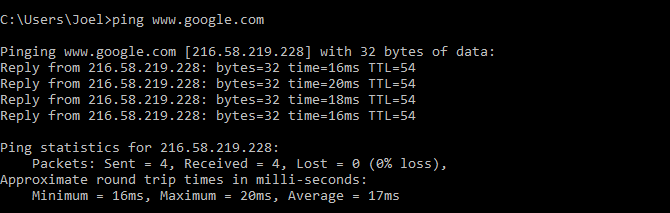
The command works by sending out multiple data packets and seeing how many of them return. If some of them don’t return, it’ll tell you (“lost”). Packet loss leads to poor performance in games and streaming, and this is a nifty way to test.

By default, it sends 4 packets, each one waiting 4 seconds before timing out. You can increase the number of packets like this:

ping www.google.com -n 10

And you can increase the timeout duration like this (value is in milliseconds):

ping www.google.com -w 6000

2. TRACERT

tracert stands for Trace Route. Like ping, it sends out a data packet as a way to troubleshoot any network issues you might have, but it instead tracks the route of the packet as it hops from server to server.

Sample usage:

windows-command-tracert

The command outputs a line-by-line summary of each hop, including the latency between you and that particular hop and the IP address of that hop (plus domain name if available).

Why do you see three latency readings per-hop?

The tracert network command sends out three packets per hop to cover packet loss or slowdowns. Just remember that it doesn’t represent your true latency. It’s best practice to average the three.

3. PATHPING

pathping is similar to tracert except more informative, which means it takes a lot longer to execute. After sending out packets from you to a given destination, it analyzes the route taken and computes packet loss on a per-hop basis.

Sample usage and output:

windows-command-pathping

4. IPCONFIG

ipconfig often comes up as the most-used networking command on Windows. Not only is it useful for the information it provides, but you can combine it with a couple of switches to execute certain tasks.

Sample usage and output:

windows-command-ipconfig

The default output shows every network adapter on your system and how they resolve. The IPv4 Address and Default Gateway details under the Wireless LAN Adapter and Ethernet Adapter sections are the most important to know.

Use this switch to flush your DNS cache:
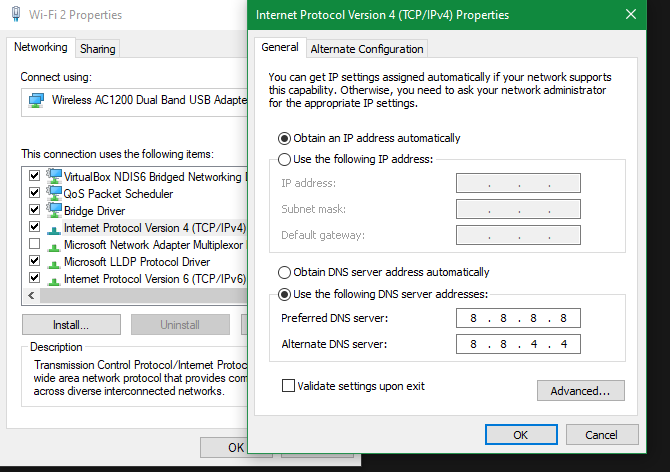
ipconfig /flushdns

Flushing the DNS cache can help when your internet is working, but a specific website or server is unreachable for some reason (e.g. a website times out and won’t load). If flushing the DNS cache doesn’t solve your connectivity issues, try these quick troubleshooting tips to fix your Internet connection


No Internet Connection? 5 Quick Troubleshooting Tips You Can Try


No Internet Connection? 5 Quick Troubleshooting Tips You Can Try

No internet connection? This quick and simple troubleshooting guide will fix your internet connection right away.
Read More

.

5. GETMAC

Every device that’s compliant with IEEE 802 standards has a unique MAC address (Media Access Control). The manufacturer assigns MAC addresses and stores them in the device’s hardware. Some people use MAC addresses to limit which devices can connect to the network.

Sample usage and output:

windows-command-getmac

You may see more than one MAC address depending on how many network-related adapters are on your system. For example, Wi-Fi and Ethernet connections would have separate MAC addresses. If you would like to know more, check out what your IP and MAC address are good for


IP and MAC Address: What Are They Good For?


IP and MAC Address: What Are They Good For?

The internet isn't so different from the regular postal service. Instead of a home address, we have IP addresses. Instead of names, we have MAC addresses. Together, they get the data to your door. Here's...
Read More

.

6. NSLOOKUP

nslookup stands for Name Server Lookup. It packs a lot of power, but most users won’t need that power. For regular folks like you and me, its main use is finding out the IP address behind a certain domain name.

Sample usage and output:

windows-command-nslookup

Note that certain domain names aren’t tied to a dedicated IP address, which means that you may get different IP addresses every time you run the command. This is normal for bigger websites because they spread their workload across many different machines.

If you want to convert an IP address into a domain name, just type it into your browser and see where it leads. Not all IP addresses lead to domain names though, and many IP addresses aren’t reachable over the web.

7. NETSTAT

netstat is a tool for network statistics, diagnostics, and analysis. It’s powerful and complex but can be simple enough if you ignore the advanced aspects that you don’t need to know about (assuming you aren’t managing a massive business or campus network, for example).

Sample usage and output:

windows-command-netstat

By default, the command shows all “active connections” on your system whether those connections are on LAN or across the internet. An active connection doesn’t mean data moving occurs — it could just mean a port that’s open and ready to accept a connection.

Indeed, netstat is mostly useful to regular users for its ability to show port information, and that can come in handy when you need to forward ports.

But the command also has about a dozen switches that change what kind of information is displayed, such as the -r switch which shows a routing table instead.

8. NETSH

netsh stands for Network Shell. It’s a cmd command for networking that lets you view and configure pretty much every network adapter on your system in more detail and granularity than any of the preceding commands.

Running the netsh command on its own will shift the Command Prompt into network shell mode. There are several different “contexts” within this shell, including one for routing-related commands, one for DHCP-related commands, and one for diagnostics, among others. But you can use it to run individual commands, too.

To see all network shell contexts:

windows-command-netsh-help

And to see all commands within a context:

windows-command-netsh-command

You can drill down one more layer to find all of the subcommands within those commands:

windows-command-netsh-subcommands

So for example, you can run this command to view all of the wireless network drivers on your system and their properties:

netsh wlan show drivers

Network Shell’s complex enough to deserve an entire article of its own. Just know that if you want to get real technical with your network configuration, you’ll probably need to use this command-line utility.

If Network Shell left you wanting to explore more than cmd network commands for your system, try these basic cmd commands every user should know


15 Windows Command Prompt (CMD) Commands You Must Know


15 Windows Command Prompt (CMD) Commands You Must Know

The command prompt is still a powerful Windows tool. Here are the most useful CMD commands every Windows user needs to know.
Read More

.

Network Commands and Other Networking Solutions

For anyone new to Windows networking commands, a cheat sheet comes in handy. With some reference, you can use a variety of cmd commands for gleaning information on your network, wi-fi, and the Internet. Still, while it’s useful to always know your options, you might want an alternative.

Maybe using cmd commands for your networking aren’t necessary for the specific problem you’re having. You should check out these diagnostic tricks and simple fixes for network problems


4 Quick Solutions to Windows Network Connection Problems


4 Quick Solutions to Windows Network Connection Problems


Read More

to see if there’s a solution for you in there.


[ad_2]

Source link

الخميس، 9 يناير 2020

How to Sync an Xbox One Controller

[ad_1]


Advertisement


Wireless controllers are convenient, but connecting them can be a bit confusing. If you’re wondering how to connect an Xbox One controller to your console, you’ve come to the right place.

Whether you have bought a new controller and need to sync it to your Xbox One or have brought your controller over to a friend’s Xbox, it isn’t difficult to pair your Xbox One controller. 

In this article we show you how to sync a controller to each model of the Xbox One, as well as a few tips if this doesn’t work for any reason.

How to Sync an Xbox One Controller to Your Console Wirelessly

  1. Turn on the Xbox One you want to sync with by pressing the Xbox button on the front of the system.

  2. Next, turn on your controller by holding the Xbox button for a moment. The Xbox button will flash, indicating that it’s looking for a console to sync with.

  3. Press and release the Bind button on your console.
    • On the Xbox One X and Xbox One S, you’ll find this small circular button at the bottom-right of your system, under the power button.

    • For the original model Xbox One, the button is on the left side of the console, right around the corner from the disc slot.


  4. After pressing the button on your console, press and hold the small circular Bind button on top of your controller. The Xbox button should flash a few times, then stay solid once connected.

[embed]https://www.youtube.com/watch?v=VFLHuDONqqA[/embed]

How to Pair Your Xbox One Controller Using a Cable

If you’d rather, you can also use a micro-USB cable to pair your Xbox One controller and console.

Simply plug the cable into a USB port on Xbox, then connect the other end to your controller. Once they’re connected, press and hold the Xbox button on the controller to sync them. You can disconnect the cable to use the controller wirelessly after the syncing completes.

Xbox-One-Controller-Connected-Cable

How to Sync an Xbox Controller to Your PC

We’ve written a full guide explaining how to connect your Xbox One controller to a Windows PC


3 Ways to Connect an Xbox One Controller to PC


3 Ways to Connect an Xbox One Controller to PC

Want to connect an Xbox One controller to your PC? Here are three easy methods for how to use an Xbox One controller on PC.
Read More

. Follow those steps to use your existing controller with your favorite PC games.

Can’t Connect Your Xbox One Controller?

The above steps should sync your Xbox controller and console in most cases. But if pairing doesn’t work, try these tips:

  • Try replacing the batteries in the controller. If you use the Xbox One Play and Charge Kit for rechargeable batteries, make sure your controller is charged.

  • Keep the controller close to the console when you sync it. The wireless connection between your console and controller has a range of about 20-30 feet.

  • Turn off any other wireless devices (like microwaves or laptops) that are close to the Xbox and controller to reduce interference.

  • Fully restart your console by holding the Xbox button on the front of the system for about 10 seconds. Disconnect the power cable for at least 30 seconds, then reconnect it and turn on your system again.

  • Remember that you can only have eight controllers connected to the system at once.

When you press the Xbox button on your controller, it tries to connect to the system it was last paired to. If you have multiple Xbox One consoles, your controller thus might be connecting to another system as soon as you turn it on.

Try fully shutting down and unplugging any other Xbox One systems in your vicinity to avoid this overlap. This also applies when you’re trying to connect an Xbox One controller to a PC when the controller is already paired with your nearby console.

Still Having Trouble? Try Fixing Your Xbox Controller

Now you know the methods to pair your Xbox One controller with any model of the console. It’s not difficult, so if you run into a problem, you may have an issue with your controller.

In that case, take a look at our troubleshooting guide for the Xbox One controller


Xbox One Controller Not Working? 4 Tips on How to Fix It!


Xbox One Controller Not Working? 4 Tips on How to Fix It!

Is your Xbox One controller not working? This troubleshooting guide will help when your Xbox controller won't connect, keeps disconnecting, won't power on, and more...
Read More

. These tips will help you fix your controller when something goes wrong.


[ad_2]

Source link

How to Change Your DNS Settings to Increase Speed

[ad_1]


Advertisement


Over the past two decades, technological developments have dramatically improved internet speeds. Broadband and fiber connections have created lightning-fast networks where even high-definition media can be loaded in just a few seconds.

That’s not to say there isn’t room for improvement. Changing your DNS settings is often cited as one of the easiest ways to optimize your internet speed. So, let’s take a look at how DNS works and how to change your DNS settings.

What Is DNS?

When you enter a website’s URL into your browser, it needs to be translated into the site’s IP address to send and receive data. The Domain Name System (DNS) is the digital equivalent of a phonebook, providing a number (IP address) for a given name (URL).

For example, if you enter www.makeuseof.com into your browser, the DNS server translates that into an IP address—in this case, 54.221.192.241. With over a billion websites currently online, it isn’t practical to maintain a list that large. Instead, your DNS server stores a cache for a range of websites.

If you try to access a site that isn’t already cached, then your DNS server will request the entry from another server. Your default DNS server is likely to be provided by your ISP and isn’t guaranteed to be the best performing server.

A Question of Geography


How to Change Your DNS Settings to Increase Speed Network Cables Deposit Photos
sommaill/DepositPhotos

The infrastructure supporting the internet is a series of copper and optical cables which connect servers around the world. Data is carried across these cables in the form of electromagnetic waves, with speed limited to the speed of light. While we can’t do anything to increase that speed, we can reduce the distance these waves have to travel.

If a DNS server is located far away from you, then your browsing speeds will be impacted. However, the reality of the internet is more complicated than simple distance calculations would have you believe. Google Public DNS is one of the most popular DNS server alternatives and uses two IP addresses (8.8.8.8 and 8.8.4.4).

These are known as anycast addresses, with multiple servers around the world responding to requests from these addresses. The servers responding to the requests vary throughout the day, depending on network conditions and traffic. Despite returning your queries from servers around the world, it is consistently ranked as one of the fastest DNS servers.

They have achieved this by working with Content Delivery Networks (CDNs) to attach location data to DNS requests. In most cases, if you were to use a Canadian DNS server, then the CDNs would assume that you are in Canada.

This has an impact on loading speeds, and the content you see will be optimized for a Canadian audience. CDNs have become essential to the operation of the internet, that they are a key component in whether you can really break the internet


Can You Really Break the Internet?


Can You Really Break the Internet?

When social media goes crazy, we say someone has "broken the internet"---but can you really break the internet?
Read More

.

Google and OpenDNS attach your IP address to the DNS requests. This means that the data is loaded from a server local to you, improving your overall internet speed.

DNS Route Optimization


Image of a city map with a red route traced across
mmaxer/DepositPhotos

When planning a trip with Google Maps, you’re presented with several different travel options. Some of the routes will take less time, even if they cover a greater distance. This could be due to many factors like traffic, transport changes, and average speed.

When selecting a DNS server to increase your internet speeds, you’ll be faced with a similar range of factors. Choosing the most advantageous path is known as route optimization. Some DNS servers, like those provided by ISPs, will experience heavy traffic, especially during peak times.

Some servers have outdated records, or inefficiently route your data. The complex interplay between servers and connections makes route optimization integral to improving your internet speeds. Your ISP’s DNS server may be located close by. However, their one-size-fits-all approach is unlikely to offer you the best performance.

This is where a tool like Google’s Namebench comes in handy. It offers a free speed test to help you find the fastest DNS to optimize your internet speed. Namebench analyzes your connection and recommends the best DNS servers explicitly tailored to you.

Namebench isn’t your only option; there are other ways to find the fastest DNS to optimize your internet speed


Find the Fastest DNS to Optimize Your Internet Speed


Find the Fastest DNS to Optimize Your Internet Speed

Other DNS servers can be faster than your ISP's DNS servers. Find the best DNS settings for your connection with these tools.
Read More

, too.

How to Change DNS Settings

Windows 10 Change DNS Settings

While your ISP likely has its own DNS server, it probably isn’t the fastest option available. Instead, you’ll want to change your operating system’s DNS settings. There are three leading alternative DNS providers; Google DNS, OpenDNS, and Cloudflare DNS.

To change your DNS on Windows 10, head to Control Panel > Network and Internet > Network and Sharing and click on Change adapter settings on the left-hand side.

This opens a list of all available networking devices. You’ll be connected to the internet either via a wired Ethernet port or via a Wi-Fi adapter. Depending on your setup, right-click the internet-connected device and select Properties.

Highlight the option titled Internet Protocol Version 4 (TCP/IPv4) and click Properties. Navigate to the Use the following DNS server addresses option.

In this area enter the following IP addresses, depending on which DNS provider you want to use:

  • Google DNS: 8.8.8.8, 8.8.4.4

  • Cloudflare IPv4: 1.1.1.1, 1.0.0.1

  • OpenDNS: 208.67. 222.222, 208.67. 220.220

Once entered, click OK to save these settings. You’ll be returned to the Properties menu. From here, select Internet Protocol Version 6 (TCP/IPv6) and click Properties. You can now repeat the process for IPv6 DNS servers.

  • Google DNS: 2001:4860:4860::8888, 2001:4860:4860::8844

  • Cloudflare IPv6: 2606:4700:4700::1111, 2606:4700:4700::1001

  • OpenDNS: 2620:119:35::35, 2620:119:53::53

Click OK to save your IPv6 DNS settings. You can then close all settings windows and return to your regular internet browsing. Once you’ve clicked to confirm those settings, you’ll begin using your new DNS servers.

The Need for DNS Speed

While there is no silver bullet to improve internet speeds, you can make numerous smaller tweaks and improvements. These improvements work together to increase your overall internet speed. The DNS server you choose will play an essential role in this process.

If you’ve been experiencing issues with your DNS server, you may want to try these steps to troubleshoot an unavailable DNS server


What Is a DNS Server and Why Is It Unavailable?


What Is a DNS Server and Why Is It Unavailable?

A DNS server matches a host and domain name with its server IP address. When a DNS server is unavailable, you can't reach the URL.
Read More

.


[ad_2]

Source link

7 Reasons Why Your Smartphone Has Slow Internet Speeds

[ad_1]


Advertisement


Smartphones are now the main way most of us connect to the internet. And it means getting the fastest possible internet speeds on our mobile devices is more important than ever.

But that doesn’t always happen. There are lots of things that can slow you down. Let’s take a look at the main reasons why your internet is so slow on your phone, and how you can fix them.

1. Poor Router Position

One of the main reasons your phone Wi-Fi is slow is that your router has been positioned in the wrong place. A Wi-Fi signal has a range of up to 230 feet, and the further it travels the slower it gets. It can be blocked by large physical objects, like walls, floors, and doors.

So if you’re a distance from the router—like in the furthest bedroom in your house, or even outside—the speeds you get may be a lot slower than you’d expect.

There’s a quick way to test. The Wi-Fi icon on your phone’s status bar gives you a rough indication of the signal strength.

why slow internet speeds on smartphone

  • When the icon is full, you’ve got a strong signal. This suggests your slow internet has a different cause.

  • When it’s empty your signal is weak, and other Wi-Fi devices like your laptop should also be affected. Move closer to your router and your signal strength—and internet speed—should improve.

When the weak signal does improve as you get closer, it shows that your router’s position is the problem. Try experimenting with different router positions to see if you can get better Wi-Fi coverage throughout your home.

If your speed doesn’t improve when you get closer to the router, you may have other problems you need to fix.

2. Congested Wi-Fi


Another router issue that makes your phone internet slow is congestion. Routers broadcast their signal on a specified channel, but if your neighbors have their routers set to the same channel it can become congested and degrade the performance for everyone.

This can be a problem especially in apartment blocks, where you have a lot of routers crammed into a relatively small area.

To fix this, you need to use software that can help you find the best channel for your router


How to Pick the Best Wi-Fi Channel for Your Router


How to Pick the Best Wi-Fi Channel for Your Router

What's the best Wi-Fi channel for your router and how do you change it? We answer these questions and more in this quick guide.
Read More

. We recommend the Wi-Fi Analyzer app on Android, or the AirPort Utility on iPhone.

3. Wi-Fi Noise

[embed]https://www.youtube.com/watch?v=JsUcROLH5cc[/embed]

Wi-Fi is also susceptible to noise from other appliances in your home. Things like microwaves, wireless doorbells, and cordless phones can interfere with the signal from a router running on the 2.4GHz band.

Most modern routers can work on both the 2.4GHz and 5GHz bands. The latter is a lot less prone to interference. If you’ve got a reasonably recent router that supports this, you can delve into the router’s settings to make the change.

Before you do it, though, you need to make sure all your connected devices support 5GHz, or they’ll no longer be able to connect. Unless you’ve got a dual or tri-band router, it won’t be able to switch between the two. You have to choose either one or the other.

If you’re sticking with 2.4GHz, make sure you don’t have any other devices near your router that could cause interference. And prepare for possible disruption if you’re streaming Netflix while standing in the kitchen making microwave popcorn.

4. You’re Connected to a Slow Network

why slow internet speeds on smartphone

One of the most obvious reasons why the Wi-Fi is slow on your phone is that you’re connected to a slow network.

At home, your speeds will get hit when other apps and devices are hogging your bandwidth. Streaming movies, downloading video games, or installing operating system updates will all cause a slowdown in your general internet use.

If you need more bandwidth at home, you can double your internet speeds using channel bonding


What Is Channel Bonding? One Way to Double Your Internet Speed


What Is Channel Bonding? One Way to Double Your Internet Speed

Looking for ways to improve your internet speed? One option is channel bonding, which you can use with hardware and software.
Read More

.

On public Wi-Fi, the speeds you’ll get can vary wildly, and you shouldn’t rely on getting a superfast service from something you aren’t paying for. However, even after checking your expectations, you might still end up getting a lot worse performance than you could.

There are so many public Wi-Fi hotspots, and your phone is liable to latch onto one of them at random. It’ll even stay connected after you’ve moved into range of a closer or better one. It means that while your favorite coffee shop might have fantastic Wi-Fi, there’s no guarantee you’ll actually connect to it every time.

A good way to try and work around this is to set the Wi-Fi network priority


How to Set Wi-Fi Network Priority on Android and iPhone


How to Set Wi-Fi Network Priority on Android and iPhone

Want to change the Wi-Fi network priority on Android or iPhone? Here's how to prioritize Wi-Fi networks on your mobile device.
Read More

on Android or iPhone. This forces your device to always connect to one of your chosen networks whenever you’re in range, and only use other free hotspots as a last resort.

5. You’re Using a Slow VPN

why slow internet speeds on smartphone

If you’re wondering why your phone internet has become slow all of a sudden, it could be because of a change made on the phone itself. One reason could be the use of a VPN, which gives you security and privacy online.

But did you know that your choice of VPN can have a significant effect on your internet speed?

Free VPN apps are notorious for offering terrible performance. If you’re using one and getting slow internet speeds, try disabling it temporarily to see if that improves things.

Most of the best premium VPN providers


The Best VPN Services


The Best VPN Services

We've compiled a list of what we consider to be the best Virtual Private Network (VPN) service providers, grouped by premium, free, and torrent-friendly.
Read More

have apps for iPhone and Android. These services should guarantee you much better speeds than you would get from a free alternative, along with enhanced security and privacy benefits.

6. Poor 4G Coverage

why slow internet speeds on smartphone

Slow internet on your phone isn’t just about slow Wi-Fi. When you switch to mobile data, you’d expect a 4G connection to be as fast—if not faster—than Wi-Fi. But this isn’t always true.

There are so many things that can affect your phone signal. You’ll see it often in crowded places, like at a sporting event or concert, where tens of thousands of people are trying to connect to the same cell tower at the same time.

And there are other things, too. Your distance from the nearest tower. Whether you’re indoors or outdoors. Even the weather can have an effect. Some of these things can cause you to fall back to a slower 3G connection, and some might leave you with no internet connection at all

In addition, some smaller carriers might have much more limited bandwidth, so you might never get up to top speed on those. Speak to your carrier if you have ongoing problems. If there’s no solution, it may be time to change.

7. Your Phone Is Slow

Finally, slow phone internet might just be a sign of a slow phone. Your Wi-Fi connection may be great, your mobile data coverage perfect, and you’re on a fast network. But maybe your phone just can’t keep up with what you’re asking it to do.

The resource requirements of apps and websites creep up all the time. So even when your actual internet speed is good, you might still perceive it to be slow. The phone’s hardware might be taking its time rendering a web page, for example, or be struggling to handle the graphics in an online game.

You can see this on older phones and lower-end Android phones especially. But even if you’ve got an up to date, high-end device your choice of apps can still have an impact.

Too many apps downloading and syncing in the background can hog too much of your available bandwidth. You can use a download manager on Android


Why Use an Android Download Manager? The 3 Best Apps to Try


Why Use an Android Download Manager? The 3 Best Apps to Try

Anyone who downloads often on their Android phone needs a download manager app. Here are the best ones to try.
Read More

to help schedule downloads for a specific time.

Older or poorly written apps can make your phone slow generally. Make sure to keep your apps up to date, uninstall those that you don’t use, and keep an eye on which are allowed to run in the background.

It might even be time to consider whether it’s worth buying a new smartphone


Upgrading Your Smartphone? 5 Questions to Ask Before You Do


Upgrading Your Smartphone? 5 Questions to Ask Before You Do

Thinking about upgrading your phone? Stop right there! Before you spend a single dime, ask yourself these key questions.
Read More

.

Why Is My Phone Internet So Slow?

As you can see, there are lots of reasons why the internet is slow on your phone. Fortunately, most of them are easy to fix. They’re often caused by issues with your router—if you need even more advice take a look at our essential guide on how to speed up your router.

And if that still doesn’t fix it, there’s one more thing you can try. See our list of the best Android apps for slow internet


10 Best Android Apps for Slow Internet or Bad Network Connectivity


10 Best Android Apps for Slow Internet or Bad Network Connectivity

Regularly losing connection or just generally have slow data speeds? Then you need these lite Android apps.
Read More

to learn how you can work around the problem.


[ad_2]

Source link

9 Common iCloud Problems (And How to Fix Them on Your iPhone or iPad)

[ad_1]


Advertisement


Anyone who has an Apple device probably uses iCloud as well. This cloud storage service makes it easy to sync photos, calendars, documents, and more across all your Apple products. But if iCloud isn’t working, you might lose access to all that data!

We’ve put together a list of the most common iCloud problems from across the web, explaining everything you can do to fix them. So whether you’ve got iCloud sync issues or you can’t sign in from your iPhone, you can find the solution below.

1. Cannot Connect to iCloud

Cannot connect to iCloud iPhone alert

Connection issues are the most common problem with iCloud. They often crop up when you’re trying to sign in or sync data, but can even happen when you’re using unrelated apps on your iPhone or iPad.

The first step to take when your device cannot connect to iCloud is to check that Apple’s systems are all online. Go to Apple’s System Status website and make sure every iCloud-related service has a green circle next to it.

Differently shaped symbols in yellow or red mean Apple is experiencing problems with that service. When that happens, there’s nothing you can do but wait for Apple to fix it.

If iCloud is up and running, there may be new terms and conditions for you to agree to before connecting. Open the Settings app on your iPhone or iPad and tap [Your Name] at the top of the screen. A popup prompts you to agree to new terms and conditions if there are any.

Failing that, you should sign out of iCloud on your iPhone or iPad, then sign in again. To do this:

  1. Go to Settings > [Your Name].

  2. Scroll down and tap Sign Out.

  3. If prompted, enter your Apple ID password to Turn Off Find My Device.

  4. Choose what data to keep on your device—anything you don’t keep is still saved to iCloud—then tap Sign Out.

  5. Return toSettings to sign in again using your Apple ID details.

2. iCloud Doesn’t Sync Data Across Devices


When iCloud works, everything syncs automatically without any extra effort from you. That means you can take a photo or edit a document on one device, and those changes instantly sync to your other devices as well.

Unfortunately, iCloud doesn’t always work seamlessly. When that’s the case, try these tips to fix it:

  1. Hold the Sleep/Wake button, then slide to power off your device. Wait a minute or so before you press the button again to restart.

  2. Try streaming a video over the web to test your Wi-Fi connection


    How to Test Your Wi-Fi Speed (And 7 Mistakes You Should Avoid)


    How to Test Your Wi-Fi Speed (And 7 Mistakes You Should Avoid)

    Wi-Fi speed tests can tell you how fast your wireless speed is. These tips will help you check Wi-Fi speed accurately.
    Read More

    . If it’s slow, restart your router to see if that fixes it.

  3. Go to Settings > [Your Name] on each device and make sure you’re using the exact same Apple ID account. If not, Sign Out and then sign in again with the correct details.

  4. Visit Settings > [Your Name] > iCloud and turn on each of the services you want to sync.

3. Third-Party Apps Don’t Save to iCloud


Some third-party apps save data to iCloud, allowing them to sync across all your Apple devices. Usually, they do this automatically. But if your apps aren’t syncing the way you expect them to, you might need to tweak the settings yourself.

Check the iCloud sync settings on each of your Apple devices by performing these steps:

  1. Go to Settings > [Your Name] > iCloud.

  2. Scroll through the list and turn on the apps you want to sync over iCloud.

  3. If your app is missing from the list, contact the developer to ask if this feature is supposed to work in the app.

4. Your iCloud Settings Never Stop Updating

Updating iCloud Settings screen

This persistent loading screen usually appears after signing in to iCloud on your device, sometimes during the initial setup. Wait at least five minutes before trying to fix it; sometimes iCloud is still working, but is quite slow.

If you’re still stuck on the updating iCloud settings screen after some time, try the following tips to fix it:

  1. Hold the Sleep/Wake button, then slide to power off your device. Wait a minute or so before you press the button again to restart it.

  2. If it’s unresponsive, follow these steps to force restart your iPhone or iPad


    How to Force Restart an iPhone and Enter Recovery Mode


    How to Force Restart an iPhone and Enter Recovery Mode

    Here's how to force restart and use the iPhone recovery mode to restore your device. This works for iPad and iPod touch too!
    Read More

    .

  3. After restarting your device, open Settings and sign into iCloud again.

5. iCloud Authentication Error Appears When You Sign In

Authentication Error iPhone alert

Most of the time, when you can’t sign into iCloud, it’s because you entered the wrong username or password. But sometimes an Authentication Error appears even when you use the right credentials.

If you get this message or similar failed authentication messages, try these steps to fix it:

  1. Go to the Apple ID website.

  2. Use your Apple ID username and password to sign in.

  3. If you still can’t sign in, click Forgot your Apple ID or password? to reset your login details.

6. iCloud Says You Have an Unsupported Apple ID

iCloud Apple Support website

You may have created an Apple ID under non-standard circumstances, which can cause problems with iCloud. Typically, if an Apple ID works with Apple’s other services—like the App Store or iTunes—it shouldn’t have any issues with iCloud either.

If your Apple ID doesn’t work with any of Apple’s services, contact Apple Support directly. They can offer you individual assistance to resolve this iCloud issue.

7. You Ran Out of iCloud Storage

Not Enough Storage alert from iPhone

Apple gives everyone 5 GB of iCloud storage for free, but that’s usually not enough to last long. After all, you can use iCloud to store all kinds of data: iPhone backups, high-quality photos, emails, and iCloud Drive files.

When you run out of iCloud storage, there are two ways to fix it: clear some space in your iCloud account, or buy more iCloud storage. If you want to create more free space, find out how to manage your iCloud storage


How to Access and Manage iCloud Drive Files From Any Device


How to Access and Manage iCloud Drive Files From Any Device

iCloud Drive is a handy tool, but accessing your files can be a little confusing since Apple's cloud storage experience really differs depending on your platform or device.
Read More

and delete some of the content on there.

Otherwise, follow these instructions to buy more iCloud storage:

  1. Go to Settings > [Your Name] > iCloud > Manage Storage.

  2. Select Change Storage Plan.

  3. Select your storage upgrade option from the list, and enter your Apple ID password to confirm the monthly subscription.

  4. Apple charges you immediately, and the storage is available right away.

8. Verification Fails When You Sign In or Out of iCloud

Verification Failed iPhone alert

You might find you can’t sign in to iCloud on your iPhone or iPad because Verification Failed. Sometimes, you can’t sign out of iCloud either for the same reason. This is often an issue with your internet connection or Apple ID login details.

There are a few ways to fix it:

  1. Hold the Sleep/Wake button, then slide to power off your device. Wait a minute or so before you press the button again to restart it.

  2. If it’s unresponsive, follow the steps to force restart your iPhone or iPad as linked in section 4 above.

  3. Try streaming a video over the web to test your internet connection. If it’s slow, restart your router to see if that fixes it.

  4. Make sure your device’s date and time are correct by going to Settings > General > Date & Time. Turn on the option to Set Automatically if it’s not already.

  5. If you have another device using the same Apple ID, go to Settings > [Your Name] > Password & Security > Get Verification Code. You need to use this six-digit code to sign in if you use two-factor authentication with iCloud.

9. Your Device Keeps Asking for an iCloud Password

Sign In to iCloud iPhone Alert

This is an old iCloud problem that keeps popping up from time to time.

You’re in the middle of using your iPhone or iPad when a prompt appears asking you to enter your iCloud credentials. You do that, but a few moments later it appears again, then again, and so on.

Here’s how to fix it:

  1. Restart your device using the instructions we gave earlier, or force restart your device using the link in step 4 above if it’s unresponsive.

  2. Go to Settings > [Your Name] > Sign Out, then choose not to keep any data on your device. After signing out, return to Settings and Sign In again.

  3. Visit Apple’s System Status website to make sure iCloud is working properly.

  4. Visit Apple’s iForgot website to reset your Apple ID password, then sign in to iCloud on your iPhone and/or iPad using the new password.

  5. Finally, back up and restore your iPhone


    How to Restore Your iPhone or iPad From a Backup


    How to Restore Your iPhone or iPad From a Backup

    Here's what you need to know when it's time to restore your iPhone from backup. Here are the best methods, tips, and more.
    Read More

    . This process can be time-consuming, so save it for the last resort after everything else.

Fix iCloud Problems so You Can Back Up Your Device

No matter the circumstances, it’s always annoying when iCloud isn’t working. But if your iPhone or iPad also can’t back up to iCloud, you might find yourself at serious risk of data loss.

iCloud backups are the most valuable aspect of Apple’s cloud service, since they protect all the data on your devices. Whenever you come across problems, do what you can to troubleshoot issues with your device backing up to iCloud


iPhone Won't Back Up to iCloud? 9 Fixes to Try


iPhone Won't Back Up to iCloud? 9 Fixes to Try

Trying to back up your iPhone, but finding that your iPhone won't back up to iCloud? Here's how to fix iCloud backup issues.
Read More

.


[ad_2]

Source link

Is Your Mac Running Slow? 10 Simple Tips to Speed It Up

[ad_1]


Advertisement

It’s well known that all computers, including Macs, slow down over time. This drop in performance can be frustrating, and it’s easy to think that you need to splash out on extra RAM—or even buy a new machine—sooner than you’d like.

But there are a number of easy tweaks that can boost your computer’s performance and speed up that slow Mac, and they won’t cost you a penny.

First: Mistakes That Make Your Mac Run Slow


We’ve previously covered some causes of a slow Mac when we looked at common mistakes that slow down your Mac


7 Common Mistakes That Slow Your Mac Down


7 Common Mistakes That Slow Your Mac Down

Is your Mac running slow? By changing some of your computing habits, you could improve its performance. These 7 big mistakes can slow down your Mac.
Read More

. Before continuing, you should go through that guide so you know what not to do.

It covers quick fixes like closing demanding programs and clearing your caches which bring immediate performance improvements in your Mac. But if your computer still isn’t performing as you’d like, continue with the tips below.

1. Upgrade macOS


Many people still believe the myth that operating system upgrades always slow down your machine. And while they can sometimes have performance issues on really old computers, these updates usually do more good than harm. They include bug fixes, patches, and improvements that often increase the speed of your Mac.

These OS update files can be pretty large, though. So if you’re running low on hard drive space, you’ll likely want to free that up first (see step 2, below).

To update your OS, make sure your laptop is connected to a power outlet, and back up your Mac first in case anything goes wrong. Click the Apple menu in the top-left corner of your screen and go to About This Mac > Software Updates.

If a software upgrade is available, you’ll see an Upgrade Now button. Click that and the download will start.

macOS upgrade

After a while, your computer will restart itself, and you’ll walk through the installation process. This update process will update not just the operating system, but also many of the default apps from Apple.

2. Free Up Hard Disk Space


As your storage drive reaches its capacity, performance drops off rapidly. Large files have been shown to have more of a negative effect on your Mac’s speed than small files. It’s thus always wise to keep at least 25% of your disk space free if possible.

To check how much free space you have on your hard drive, go to Apple menu > About This Mac > Storage.

Mac Storage Low

If you’re running low on space, as shown in the image above, it’s worth going through our guide on how to free up space on your Mac. That takes you through how to do each of the following step-by-step:

  • Empty the trash

  • Uninstall apps you don’t use

  • Find and delete large files

  • Delete iTunes files and iOS backups

  • Take a look at cloud storage apps

  • Optimize storage in the photos app

  • Store your Desktop and Documents folders in the cloud


In addition, we’d also recommend moving your photos and music libraries over to an external hard drive, as they can take up a huge amount of space. Make at least two copies (or back up with a cloud provider) in case one of your drives fails.

After working through the steps in that guide, I freed up an additional 34GB of hard drive space.

Free up mac hard disk space

3. Remove Startup Items


To help your Mac boot up faster


How To Make Your Mac Start Up Faster


How To Make Your Mac Start Up Faster

Is your Mac taking forever to boot? Here's how to speed it up.
Read More

, you should minimize the number of background processes that load each time you restart. To do this:

  1. Go to System Preferences > Users & Groups and select your account name on the left sidebar.

  2. Click Login Items.

  3. Select the items you no longer wish to load at startup.

  4. Remove these by clicking the minus button.


Mac startup items

4. Delete Unnecessary Widgets


Having a bunch of widgets running in the background can also have an impact on your Mac’s speed. To remove some of these:

  1. Open the Notification Center by clicking the button at the top-right corner of the screen.

  2. Go to the Today tab.

  3. Click Edit at the bottom of the Notification Center.

  4. Click the red delete button to remove any widgets that are unnecessary.


Delete Widgets From Notification Center

5. Rebuild the Spotlight Index


If Spotlight has stopped returning the results you’d expect, or is running particularly slow, rebuilding the Spotlight index should help. Follow these steps to do so:

  1. Go to System Preferences > Spotlight > Privacy.

  2. Click the Plus button and select the drive or folders that you want to reindex.

  3. Confirm that you want to (temporarily) exclude these from Spotlight.

  4. Select the same drive or folder, and click the minus button to remove these again.


Mac Spotlight Reindex Shorter

This will force Spotlight to reindex that drive or folder, which should make searching run more smoothly. This can take some time, so be patient if Spotlight seems finicky at first.

6. Turn Off Visual Effects


The barely-noticed visual effects of macOS can impact your computer performance more than you think. To disable these:

  1. Go to System Preferences > Dock.

  2. Untick Animate opening applications.

  3. Set the Minimize windows using option to Scale effect.


Visual Effects Mac

Then:

  1. Go to System Preferences > Accessibility > Display,

  2. Select Reduce Transparency.


Mac Accessibility Settings

7. Don’t Sync Too Much Cloud Data at Once


If you’re attempting to sync large folders to the cloud using services such as iCloud, Google Drive, or Dropbox, this will likely slow everything down. Be sure to routinely review which files and folders are uploading to the cloud to ensure you’re not sending too much at once.

You can review and adjust which data backs up to iCloud by going to System Preferences > Apple ID > iCloud.

To manage which folders sync with other cloud storage providers, you’ll generally need to go to the Preferences panel of the specific app that you use (like Dropbox or Google Drive). Try to avoid syncing folders that change frequently.

8. Set a Default Finder Folder


Each time you open Finder, it needs to load the folder set as its default. If this is a large folder, that can take more time than you’d like (such as if you have tons of items on your desktop). Instead, you should change this to a smaller, less demanding folder so that Finder can load faster:

  1. Open Finder.

  2. Go to the menu bar and click Finder > Preferences.

  3. In the General tab, go to the New Finder windows show dropdown, and select a new default folder.


Finder Preferences Mac

9. Remove Browser Add-ons


Since so much of most people’s computer work these days is done within a browser, it can be easy to mistake a slow browser for a slow Mac. The easiest fix here is to remove unneeded and bulky add-ons/extensions from whichever browser you use.

We’ve shown how to clean up your browser extensions the easy way


How to Clean Up Your Browser Extensions (The Easy Way)


How to Clean Up Your Browser Extensions (The Easy Way)

If you regularly check out cool extensions, then it is probably time to clean up those add-ons that you no longer want, like, or need. Here's how to do it easily.
Read More

. If you need more specific info, check out these official help pages:

10. Keep Your Apps Up to Date


Outdated apps that haven’t been optimized for the latest macOS update can cause your Mac to feel slower than it really is. It’s therefore always worthwhile to keep the software on your computer up to date.

To do this, go to App Store > Updates. If any app updates are available, you’ll see them listed. Either click to update each app individually, or choose Update All in the top-right corner to install all available updates at once.

Mac Running Slow? Not Anymore!


With these simple tips, you should see a noticeable improvement in your Mac’s speed. However, if your machine still isn’t working at a speed that’s acceptable, there are a couple more extreme (or expensive) options.

If your computer is really old, you may be best off buying a refurbished Mac to save some cash. For a less expensive option, if your model is old enough, you might be able to upgrade the RAM in your Mac.

Failing either of these, you can completely reinstall macOS


How to Reinstall macOS for a Fast and Squeaky Clean Mac


How to Reinstall macOS for a Fast and Squeaky Clean Mac

Need to restore your Mac to factory settings? Here's how to install a fresh copy of macOS and erase everything.
Read More

, without or without erasing your storage disk entirely. Doing so essentially restores your Mac to its factory settings. Hopefully it won’t come to this, though, and these tips will get you plenty more use out of your Mac.


[ad_2]

Source link

How to Force Restart an iPhone and Enter Recovery Mode

[ad_1]


Advertisement


Starting with 2016’s iPhone 7 line, Apple dropped the old mechanical home button in favor of a capacitive touch panel. Since that home button relies on software, it’s no longer used for button inputs like taking a screenshot. Further complicating this, the iPhone X line of devices introduced yet different button combinations.

This means that you might have no idea how to enter iPhone recovery mode on your new device. We’ll show you how to put your iPhone (as well as iPad or iPod touch) in recovery mode, no matter which model you have.

Jump to your device:

Force Rebooting and Recovery Mode Explained

You’ll hopefully never need to hard reset your iPhone, but it’s a good tip to know about for those occasions when something goes wrong. For example, this can help you fix ghost touch on your iPhone


How to Fix Ghost Touch on iPhone: 9 Potential Fixes to Try


How to Fix Ghost Touch on iPhone: 9 Potential Fixes to Try

Does your iPhone perform actions on its own? You might have the "ghost touch" issue. Here are several possible fixes for it.
Read More

.

When your device becomes completely unresponsive, you can choose between waiting for the battery to deplete and initiating a hard reset. A hard reset is basically the equivalent of pulling the power plug, forcing your iPhone to shut down and start up again.

Recovery mode takes this a step further, putting your device into a state where you can reinstall iOS by connecting your iPhone to a computer running iTunes (or by using Finder on macOS Catalina and newer). If your iPhone refuses to boot or crashes on startup, you’ll need to put the device into recovery mode in order to rescue it.

iPhone Recovery Mode

Note that when you reinstall iOS, you’ll lose all the data on your iPhone. This isn’t a problem if you make regular iPhone backups


How to Back Up Your iPhone and iPad


How to Back Up Your iPhone and iPad

Wondering how to back up your iPhone? Here's our simple guide to backing up your iPhone using either iCloud or iTunes.
Read More

, which you can do using iCloud or locally in iTunes or Finder. Unfortunately, you can’t back up your device in recovery mode, since iTunes will only offer to restore the firmware.

As such, if you are stuck with an iPhone that won’t boot and you don’t have a backup to restore


How to Restore Your iPhone or iPad From a Backup


How to Restore Your iPhone or iPad From a Backup

Here's what you need to know when it's time to restore your iPhone from backup. Here are the best methods, tips, and more.
Read More

, there’s nothing you can do to save your data.

How to Enter Recovery Mode on iPhone 8, iPhone X, and Newer

iPhone X and iPhone 8

Apple changed the button combination to force restart on the iPhone 8 and later. The below steps will work with the iPhone 8/8 Plus, iPhone X, XS, and XR, and iPhone 11 line.

Note that you’ll need to perform these button combinations fairly quickly.

How to Force Restart the iPhone 8 and Newer

  1. Press then release the volume up button.

  2. Immediately press then release the volume down button.

  3. Hold the side button till you see an Apple logo. Let go of the button when you see this logo.

How to Put the iPhone 8 and Newer Into Recovery Mode

  1. Connect your iPhone to a computer.
    1. On a Windows PC or Mac running macOS Mojave or earlier, launch iTunes. On a Mac running macOS Catalina or newer, open Finder.


  2. Press then release the volume up button.

  3. Immediately press then release the volume down button.

  4. Hold the side button, and don’t let go when you see the Apple logo.

  5. Keep holding till you see the Recovery Mode screen.

How to Enter Recovery Mode on iPhone 7 and iPhone 7 Plus

iPhone 7 and 7 Plus

Both the iPhone 7 and larger iPhone 7 Plus model were released in September 2016. These were to first iPhones to lack a mechanical home button, which required Apple to change these shortcuts for the first time since the iPhone launched in 2007.

You’ll also need to follow these steps to force restart the 7th generation iPod touch, released in 2019.

How to Force Restart the iPhone 7 or 7 Plus

  1. Press and hold the side button and volume down buttons at the same time.

  2. Continue holding the buttons until you see the Apple logo, then let go.

How to Put the iPhone 7 or 7 Plus Into Recovery Mode

  1. Connect your iPhone to a computer.
    1. On a Windows PC or Mac running macOS Mojave or earlier, launch iTunes. On a Mac running macOS Catalina or newer, open Finder.


  2. Press and hold the side button and volume down button at the same time.

  3. Keep holding the buttons, even once you see the Apple logo.

  4. Release both buttons when you see the Recovery Mode screen.

How to Enter Recovery Mode on iPhone 6s and Older

iPhone 6 and iPhone SE

The iPhone 6s, released in 2015, was Apple’s last iPhone with a mechanical home button. The following advice is good for that device, as well as all iPhones that came before it. This includes the Plus models, iPhone SE, and iPod touch 6th generation and earlier.

How to Force Restart the iPhone 6s and Older

  1. Press and hold both the home and lock buttons.
    1. On the iPhone 6 or later, the lock button is on the right side. For the iPhone 5s and earlier, it’s on top of the device.


  2. Release the buttons once you see the Apple logo.

How to Put the iPhone 6s and Older Into Recovery Mode

  1. Connect your iPhone to a computer.
    1. On a Windows PC or Mac running macOS Mojave or earlier, launch iTunes. On a Mac running macOS Catalina or newer, open Finder.


  2. Press and hold the home and lock buttons as mentioned above.

  3. Keep holding the buttons even once you see the Apple logo.

  4. Release both buttons when you see the Recovery Mode screen.

How to Force Restart and Enter Recovery Mode on iPad

iPad Air 2

Need to force restart or use recovery mode on your iPad instead? The process is simple.

To do this on an iPad model with a Home button, follow the same instructions for force restarting the iPhone 6s and earlier described above. If you have an iPad with Face ID, follow the above steps to force restart an iPhone 8 or newer.

Just note that on iPad, the power button is on top, not on the side.

You’re Ready to Recover Your iPhone

When you put your device into recovery mode, you’ll have 15 minutes to begin reinstalling iOS before your device automatically exits Recovery Mode. You’ll need to repeat the combination of button presses in order to put it back into Recovery Mode if this happens.

Your device will not show up as normal in iTunes or Finder while in Recovery Mode, and you’ll see an error message like the one above. You can always choose to update the firmware, or simply restore the existing version.

iTunes Repair iPhone

Once your iPhone reboots as normal, you will need to log in with your credentials to remove Apple’s Activation Lock. This is a security feature that prevents someone from using your device if you reset it without signing out of iCloud.

Because of this, you should never buy an iPhone if the seller refuses to unlock it in front of you. A reset phone with Activation Lock still enabled will ask for the owner’s Apple ID before you can begin the setup process.

iPhone Recovery Mode Made Easy

We’ve seen how to force restart your device and enter recovery mode, no matter what iPhone, iPad, or iPod touch model you have. It’s a simple process once you know it, but the increasingly confusing button combinations are a bit obtuse.

For more on recovery, check out what to do if you forget your iPhone passcode


Forgot Your iPhone or iPad Passcode? Here's How to Reset the Password!


Forgot Your iPhone or iPad Passcode? Here's How to Reset the Password!

Forgot your iPhone or iPad passcode and your device is disabled? Here's how to unlock a disabled iPhone or iPad and restore data.
Read More

.


[ad_2]

Source link

Ads

Copyright © All Rights Reserved

Designed by: Templatezy / Dreamworkdesign™ / Sb Game Hacker