Social Media

Ads

Social Media

الاثنين، 27 يناير 2020

3 Ways to Recover Deleted Photos on Any Android Device

[ad_1]


Affiliate Disclosure: By buying the products we recommend, you help keep the site alive. Read more.


Advertisement

So you’ve deleted a precious picture from your phone. Or worse, you broke or reset your device and lost them all. Now you need to know how to recover deleted photos from an Android phone.

You’ve got a few options. They range from the simple to the more advanced, so hopefully there’s a solution that works for you. Let’s get started.

1. How to Recover Deleted Photos From the Cloud

Most cloud and photo apps (not including Instagram) offer to back up your photos in the background. If you’ve got this turned on, then chances are your photo isn’t really deleted.

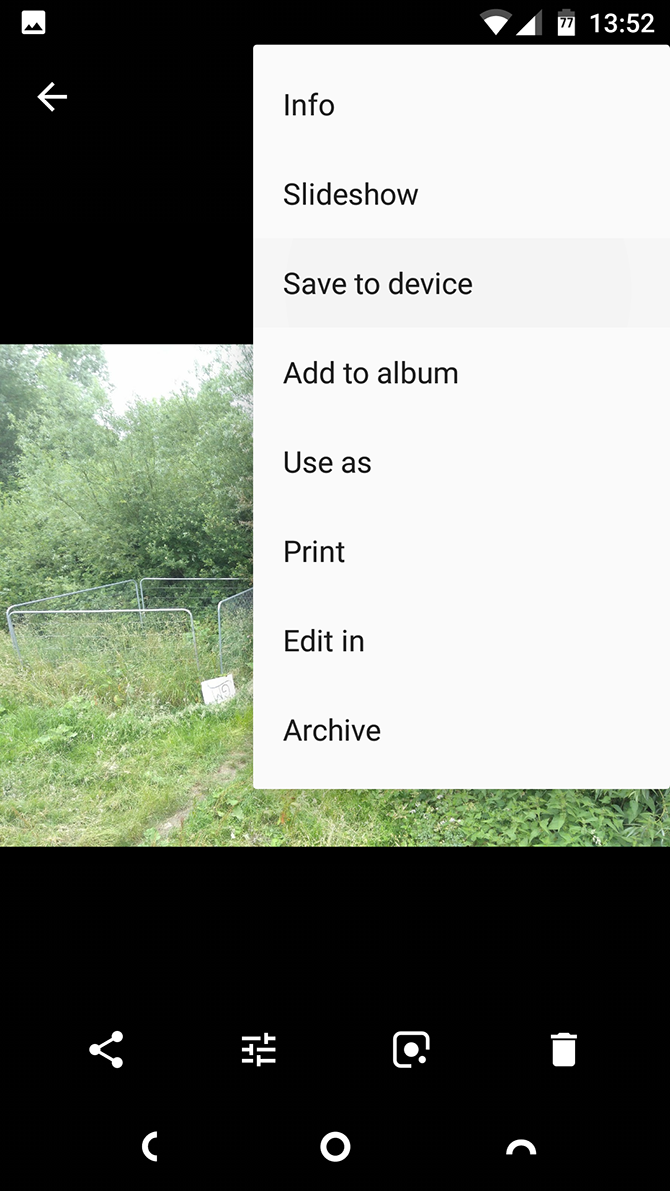
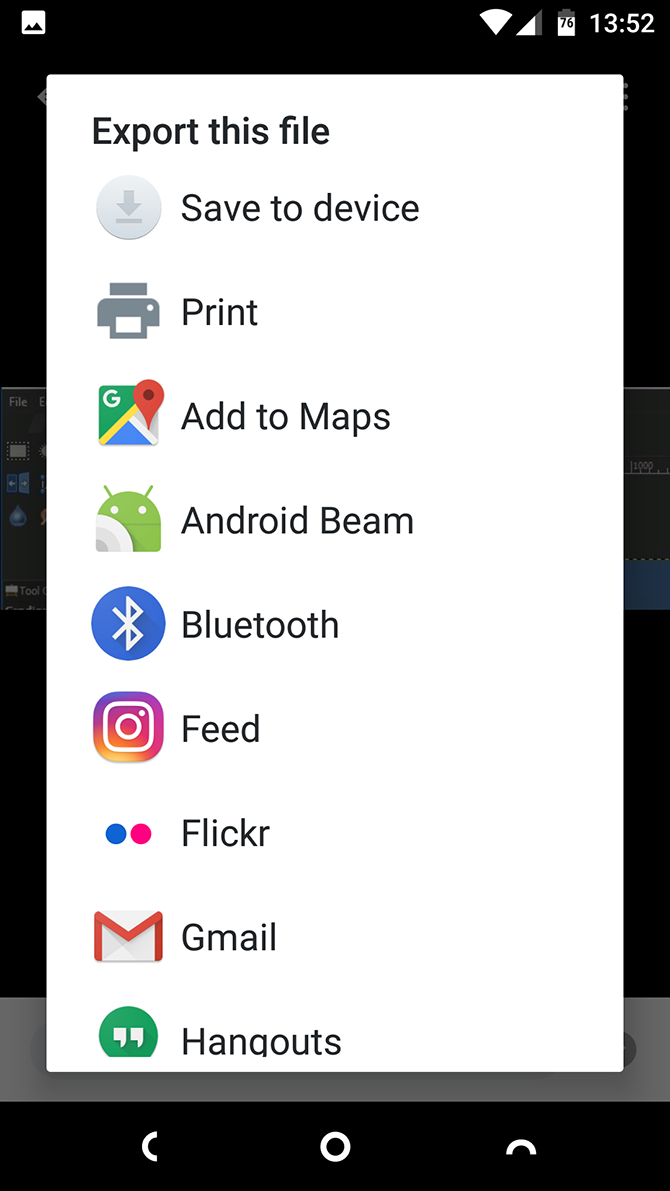
Deleting a photo from your phone’s gallery app won’t delete it from your cloud backup service. To get it back, just log into your cloud app and download it once more. In Google Photos, open the image and select Save to device from the menu. For Dropbox, this is located at Export > Save to device.


If you deleted the image from your cloud backup, you can recover it from there, too. Most cloud services use a recycle bin that allows you to restore any deleted file within a certain time frame.

How to Retrieve Deleted Photos on Google Photos

On Google Photos, open the app and select Trash or Bin from the sidebar. Long-press on each image you want to recover, then hit Restore. Deleted files remain available for 60 days.

Google Photos Recover Images Android

Recover Deleted Files From Microsoft OneDrive

For Microsoft’s OneDrive, open the app and go to Me > Recycle Bin. Select your files and tap the Restore icon. OneDrive keeps deleted files up to 30 days, although it may delete them sooner if your recycle bin is larger than 10 percent of your total storage space.

OneDrive Restore Photo Android

How to Restore Deleted Photos From Dropbox

In Dropbox, you need to log in on your desktop to recover deleted images, as you can’t do it in the app. Go to Files > Deleted Files, then select the ones you want to restore. They’re available for 30 days after deletion.

retrieve deleted files android dropbox

Other cloud apps work in similar ways. Check the terms for your account to see how long a particular service keeps your deleted files.

2. How to Recover Deleted Android Photos From Your SD Card

What if you don’t back up your photos to the cloud? If you need to know how to recover deleted photos from your gallery app, your best hope is that you’ve saved them to your phone’s SD card.

You can connect your card to a desktop computer and use special recovery software to attempt recover the lost pictures, so long as it isn’t encrypted. But there are no guarantees with this.

Deleted files remain on a memory card only until they get overwritten by new data. Thus, as soon as you realize you’ve deleted photos by mistake, you should remove your card from your phone to reduce the risk of them being overwritten.

In case you were wondering, this method won’t work on your phone’s internal storage because Android doesn’t use the old USB Mass Storage protocol anymore. This is the same reason why it’s difficult to recover deleted text messages on Android


How to Recover Deleted Text Messages on Android


How to Recover Deleted Text Messages on Android

Recovering text messages on Android is tricky business. Here are the limitations, your options, and how to back up for the future.
Read More

.

Restore Deleted Images With EaseUS Data Recovery Wizard

The best free image recovery software is EaseUS Data Recovery Wizard. You can download it for both Windows and Mac.

First, connect your memory card to your computer, either through a card reader or via your laptop’s SD card slot.

Install and run Data Recovery Wizard. Once it launches, it will show you all available drives from which you can recover data. This should include your hard drive and the memory card.

EaseUS Data Recovery Wizard

Select the memory card and hit Scan. The app will now start scanning for any files it can recover. You can restore up to 2GB of data at a time with the free version. Scanning can take up to 20 minutes or more, depending on the size of the card and how much data is on it. But you don’t have to wait for it to finish.

Select Type in the left-hand panel. Click the dropdown arrow next to Graphics and select jpg (or whatever file format your phone saves images in). All the images you can recover show in the main window. Select the ones that you want.

EaseUS recover deleted images

Click Recover Now and choose a location on your hard drive to save your images. They’ll export and save in their own folder. You can now copy them back to your phone.

3. How to Restore Deleted Photos on a Rooted Phone

If you aren’t using either a cloud backup service or a memory card, it becomes a lot harder to recover deleted photos from your Android phone. Despite claims from certain apps online, there’s no way to scan your phone’s internal storage to recover lost files—unless the phone is rooted.

If you’re desperate, you can try rooting your phone. But this may require you to wipe your device, and that significantly increases the likelihood that your deleted pictures will be overwritten and lost forever.

Fortunately, if your phone is already rooted, the process is simple. See our in-depth guide on how to root an Android phone


The Complete Guide to Rooting Your Android Phone or Tablet


The Complete Guide to Rooting Your Android Phone or Tablet

So, you want to root your Android device? Here's everything you need to know.
Read More

for more.

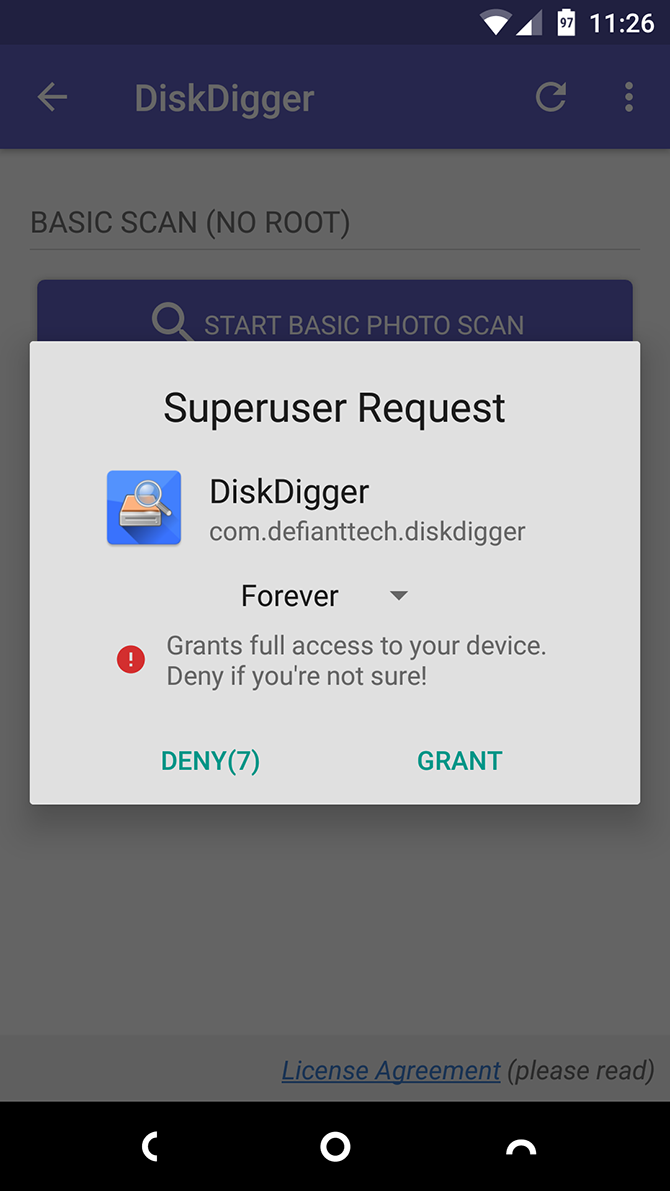
Undelete Photos With DiskDigger

Install the app DiskDigger Photo Recovery from the Play Store. This is free for photo and video recovery; you only have to pay if you want to recover other types of files.

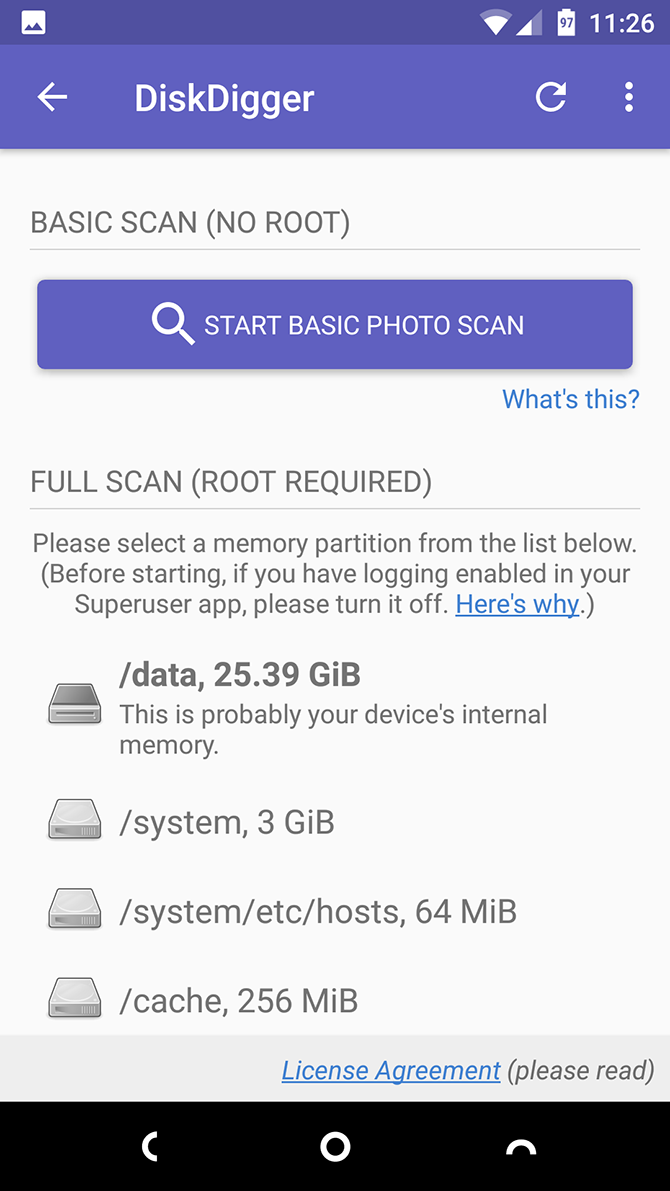
Launch the app and grant root permissions when prompted. You’ll now see Basic Scan and Full Scan options. Ignore the first one, as it can only find low-res thumbnails of your images. Instead, you’ll want to use the Full Scan option.

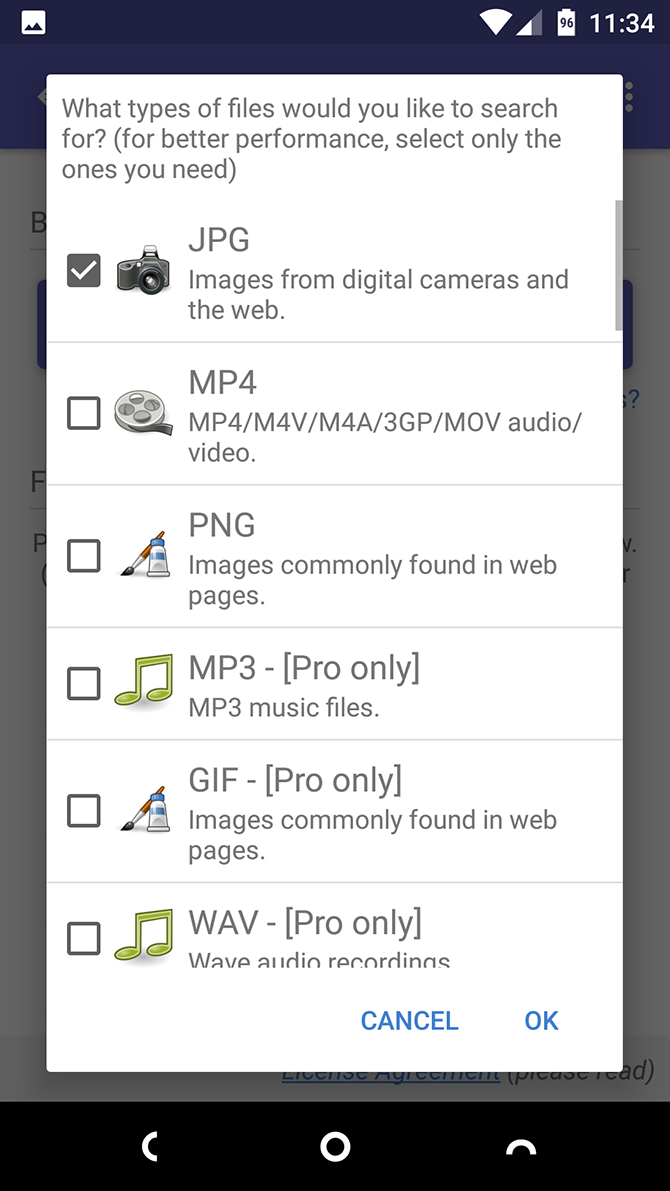
Find your phone’s internal storage. This is normally the /data partition. Tap it, then choose the type of file you want to search for (likely JPG and/or PNG). Tap OK to begin.


The app starts scanning immediately and shows you a thumbnail grid of everything it finds. It doesn’t just show your deleted photos—it shows every image in your phone’s internal storage. The process thus takes a while to complete.

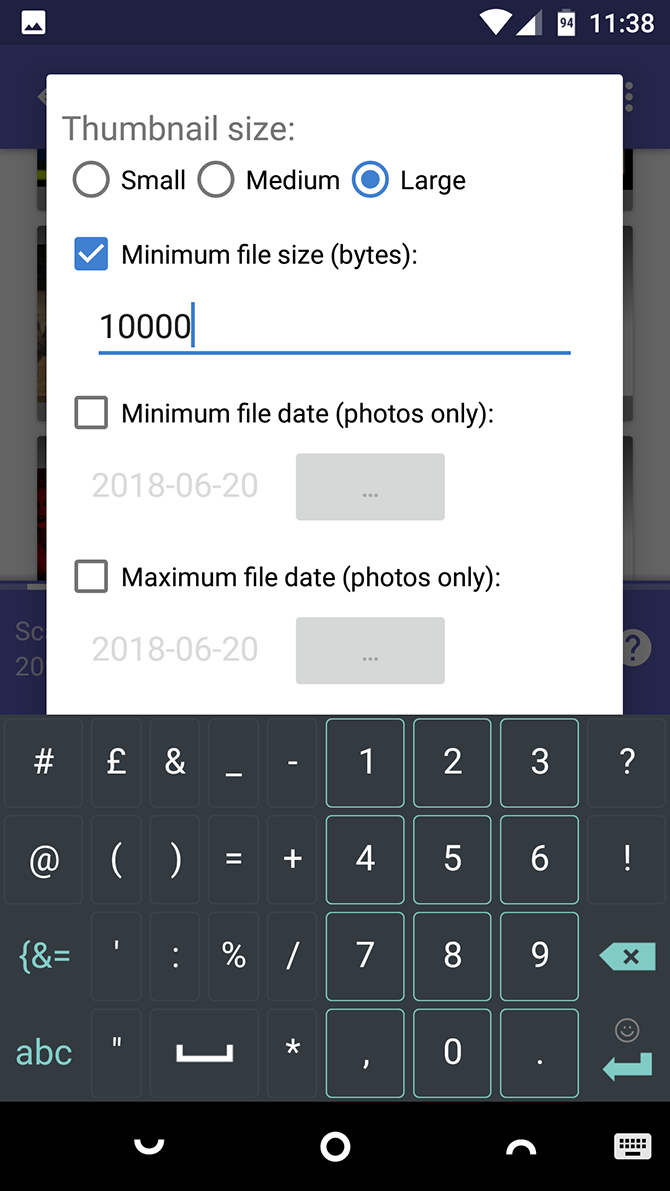
To filter out some of the findings, tap the Settings icon. You should set a larger Minimum File Size—by choosing 1,000,000, for example, you’ll limit your results to images larger than a megabyte. You can also limit the date to a time near when the photos were taken.


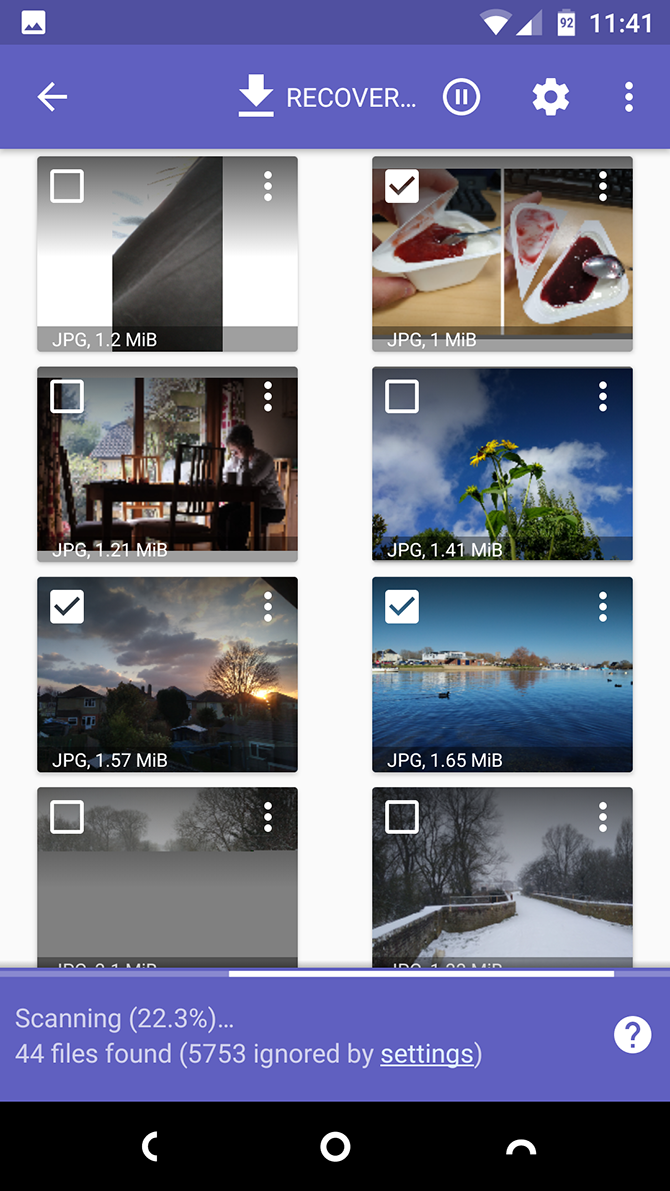
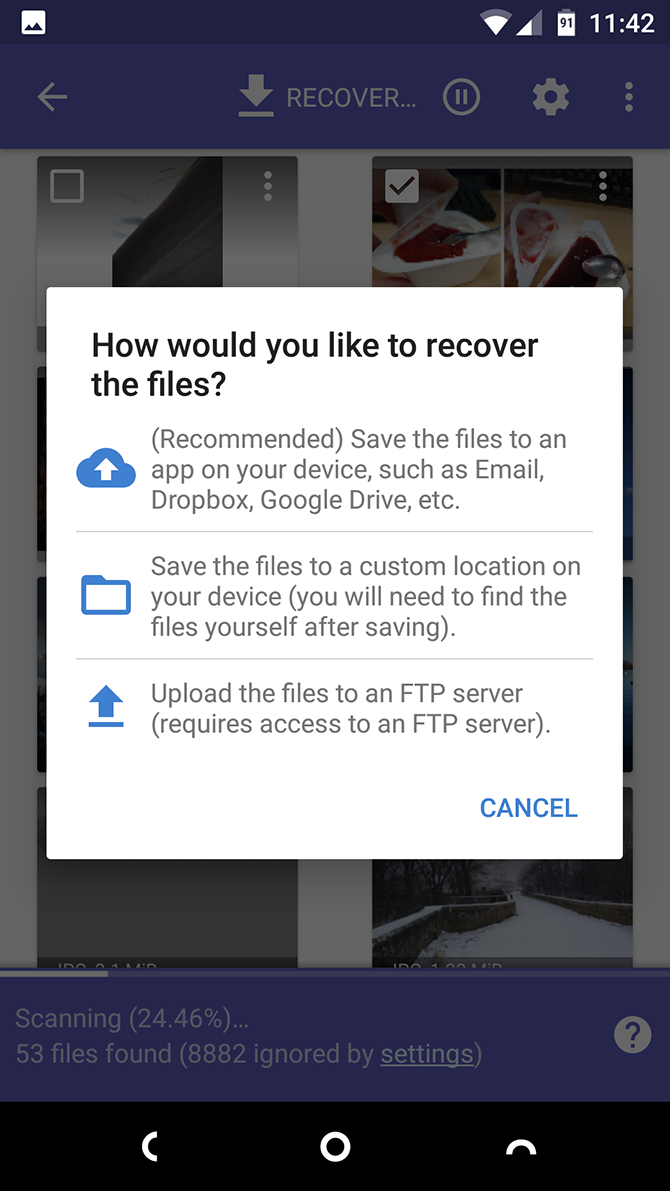
DiskDigger can’t find every deleted photo, and some might be corrupted. When it does find the ones you want, select them and tap Recover.

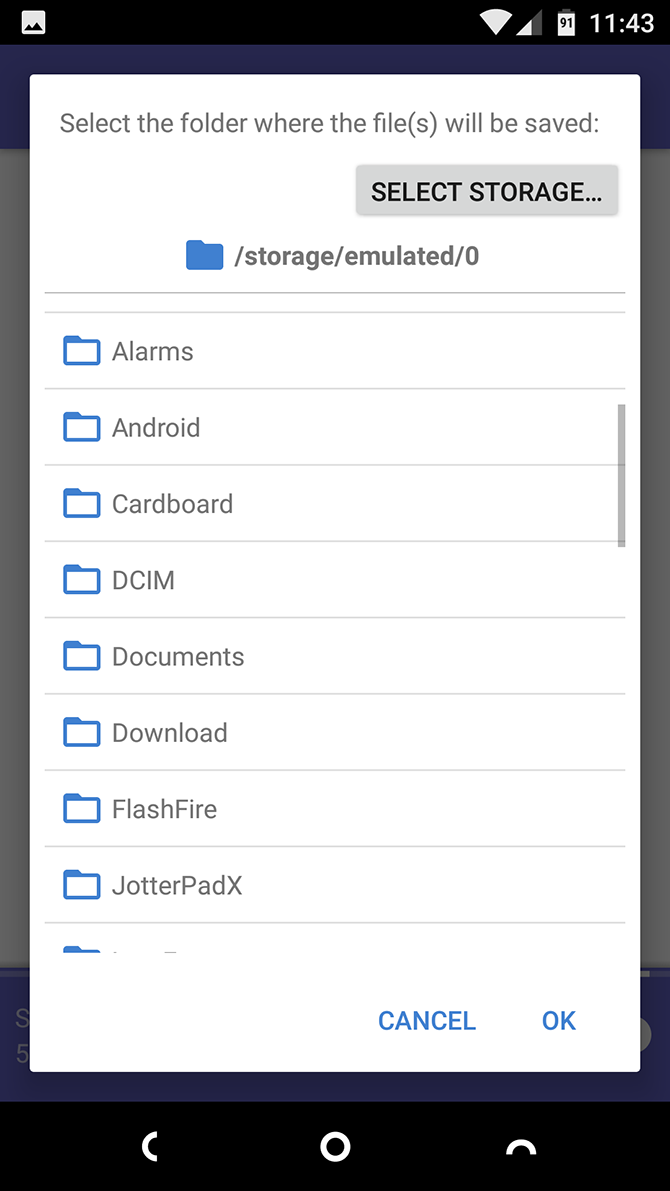
Choose where you want to save the file. You can save them to a specific app, or put them straight back into your camera folder. Choose the DCIM folder to do this. Click OK to save your photos, and you’re done.


How to Avoid Losing Your Android Photos Next Time

The best way to avoid losing your precious photos in the first place is to keep them backed up somewhere.

The easiest way is to use apps that back up your Android photos to the cloud. These apps run quietly in the background and you can control when they upload your photos. Set them to only work when you’re connected to Wi-Fi and your phone is charging and you won’t hurt your data plan or battery life.

Google Photos gives you unlimited free photo storage for 16-megapixel photos—big enough for most smartphone cameras—and 1080p videos. Flickr gives you unlimited storage on a Pro account and uploads images in their full resolution.

Photos aren’t the only important kind of data on your device; you should know the best ways to back up everything on your Android phone


How to Back Up Your Android Device Properly


How to Back Up Your Android Device Properly

Here's how to completely back up your Android device by protecting your photos, SMS, contacts, and everything else.
Read More

. With a regular backup plan, you’ll always have a copy of your information and never risk losing anything again.


[ad_2]

Source link

Now Anyone Can Make Movies for VR

[ad_1]


Affiliate Disclosure: By buying the products we recommend, you help keep the site alive. Read more.


Advertisement


Our verdict of the Insta360 EVO :
Great quality footage for immersive viewing makes this convertible 360/180 stereoscopic device the best way to start making VR movies right now. It's only let down by a non-removable battery and weak plastic clips to lock the position.
910

If you have a VR headset, you’ll know how immersive 180-degree 3D videos can be. But the hardware to produce such videos has been either too pricey or only capable of grainy, low-resolution video. Insta360 EVO changes that. Now you can make beautiful 5.7K resolution 3D, VR180 videos … for less than $500. I’m confident in saying it’s the best consumer-grade camera around for VR moviemaking.

If that wasn’t enough, the convertible design means it can transform back to a 360-degree camera. This gives it the same “shoot now, point later” magical freedom of the Insta360 OneX.

Check out our video review below–preferably on a VR headset if you have one–to find out exactly what we thought of the Insta360 EVO. Nearly all of the review was shot directly on the EVO, so there’s no better way of sampling the footage. And as always, at the end of this review, we’re giving one of these amazing devices away to one lucky reader. Enter using the competition widget at the bottom of the review.

[embed]https://www.youtube.com/watch?v=Ey2rIvmtra0[/embed]

Insta360 EVO: Specifications and What’s In The Box?

  • Insta360 EVO Hybrid 360/180 stereoscopic camera

  • Mini Tripod

  • Clip-on phone lenses for previewing videos on your phone

  • Felt carry case

Contents of Insta360 EVO package

  • Max video resolution (combined): 5760×2880 @30FPS

  • Max photo resolution: 6080×3040

  • Fixed f2.2 lenses

  • 1200mAh non-removable battery, about 45 minutes continuous shooting

  • Bluetooth 4.0, micro-USB port

  • MicroSD storage slot (no card included in the basic set)

I’m not usually one to comment on packaging, but the unboxing experience of the EVO was exquisite. The camera is secured in the box mounted to a large metal stand with a tripod screw from underneath. I’m not sure if this is supposed to serve a later function given the inclusion of a mini tripod, but it’s quite dramatic if you want to keep your device out on display.

Also in our review set was the Holoframe, an accessory for your phone that enables you to view 3D content without the need for a VR headset or special glasses. More on that later.

insta360 evo box and holoframe

Convertible Design

You can either use the EVO as a 360-degree camera, with each sensor recording a hemisphere of video; or it can be flipped open to become a stereoscopic 180-degree camera, with sensors recording the left and right eye viewpoint respectively.

When folded, the EVO is a neat little two-inch cube, weighing no more than four ounces. It’s minuscule and extremely easy to carry around.

insta360 EVO folded up

Swapping between the two modes and locking them back involves some flimsy plastic clips. These seem like they’ll be the first things to break. The buttons to unlock those plastic clips are small and fiddly too. I found myself not actually knowing if it was locked, or halfway in. Just keep it unfolded if you’re unlikely to use the 360-mode.

Controls and indicators on the EVO device itself are sparse: there are two buttons and two LEDs on top, and two LEDs on the front. One button is a dual purpose power and shutter button; the other switches mode between photo and video. The current mode is indicated by one of two LEDs. All of the LEDs flash alternately when recording. There is no menu system or LED panel: any setting beyond photo/video and record/power are done through the app.

insta360 evo buttons and controls

The battery is a little larger and therefore lasts longer than the OneX, but on the flip-side it’s non-removable. Still, when shooting for VR, it’s easy to plug the camera into an external power source, since the rear view is invisible (unlike 360-degree videos, where you can’t hide anything).

360-Degree Features Too? Why Would Anyone Buy the OneX Then?

Despite being a convertible design, don’t think this model is a replacement for the OneX device


The Insta360 OneX is a Magical Action Cam


The Insta360 OneX is a Magical Action Cam


Read More

. They do share many of the same features: the core ability to shoot now and point later, automatic removal of the magic selfie stick, TimeShift and FlowState Stabilization, as well as some of the more obscure modes like Tiny Planet. You’ll find all that when shooting in 360-mode on the EVO. I’ve glossed all of this, despite being incredible, because they can all be seen in our Insta360 OneX review


The Insta360 OneX is a Magical Action Cam


The Insta360 OneX is a Magical Action Cam


Read More

.

But two features are noticeably absent. You can’t LiveStream to social platforms, nor can you record Bullet Time sequences. If those were things that really stood out to your from the One X, stick with that. In addition, the lenses are physically further from each other, so the stitching along the horizon may contain more errors. This is a relatively minor gripe, but my point is that if 360-degree shots are your primary intent, buy the OneX instead.

FlowState Stabilization for VR Too

One feature that really differentiates the EVO from competitors is the FlowState Stabilization technology, which gives you ultra-smooth footage by using the onboard gyroscope. This works in both the standard 360-degree mode, as well as 180-degree stereoscopic.

That said: it’s important to remember that most new VR users (and even some experienced ones) will find artificial motion in VR makes them nauseous. It’s a bit like motion sickness, only in reverse. Your eyes perceive movement, but your body isn’t feeling it. For a while, the advice when filming for an intended VR audience was to remain static and simply observe the scene, but this has relaxed a little as most users develop their “VR legs” quickly. Still: know your audience before deciding whether to use camera movement.

If you do intend to move the camera, do it slowly. The FlowState Stabilization certainly helps to smooth things out compared to not having it all.

[embed]https://www.youtube.com/watch?v=FWqi_3rWJEc[/embed]

Preview the Shot in VR

When previewing something intended for VR on a flat screen, it’s practically impossible to get an idea of scale or presence.

But if you have a Vive Focus, Oculus Go or Oculus Quest, you can preview the footage live through the Insta360 VR app. This is yet another standout feature that sets apart the Insta360 EVO. You can view both the videos already taken and stored on the microSD card, as well as a live viewfinder. You can stream directly from the camera, while you’re shooting. This takes away the guesswork of framing correctly or ensuring objects aren’t too close. There is, of course, a small delay when streaming over Wi-Fi, and you can’t watch at the full resolution.

preview insta360 evo on the oculus go

While it is an incredible feature to have, I didn’t find myself using it to preview shots that much. It was useful for checking out what I’d already recorded, though, and the whole process is about as seamless as it could be. Put on your headset, connect to the camera’s Wi-Fi, open the app. Done.

The Editing Workflow

If there’s one serious drawback to the EVO, it’s the amount of effort required to edit the video. This isn’t a unique problem to the EVO, but it is compounded by such high resolutions!

While the mobile app is perfectly functional for short clips, it’s limited to producing 4K content. For the full quality 5.7K resolution, you’ll need to process the files from the Insta360 Studio desktop app. It took about half a day just to output all the footage I took for the review video, with my MacBook Pro fans running full speed. You’ll also need an enormous hard drive: it works out at about 1 GB per minute.

That’s just to output the raw footage: you’ll need a professional editing suite like Adobe Premiere or Apple Final Cut Pro X to take advantage of 360-degree editing. (Pro-tip: For Final Cut, make sure you select horizontal 360-degree stereoscopic top/bottom as your output format. It’s the last option on the list, and not the default).

Editing for VR in final cut pro x

After you’re done editing, it will, of course, take longer than usual to render your final video, given such a high resolution.

But you’re not finished yet: for uploading to YouTube and displaying it as a VR180 video, you’ll need to use Google’s free VR180 Creator tool to inject the required metadata. Otherwise, YouTube doesn’t know it’s designed for VR, and will just try to compress it to a regular viewing window.

In short, it took an inordinate amount of time to process, edit, render, inject metadata, then upload the 15 GB review video you see embedded!

You’ll need a powerful machine, a big hard disk, an unlimited internet connection, and a mountain of patience. I should note that there is apparently a more direct integration with Adobe Premiere, but I don’t have that to test with.

The Holoframe and Clip-on Glasses

The Holoframe looks like a regular gel phone case, and is designed to be used as one when you’re not previewing videos. When you do want to use it, just snap it off the back and clip it onto the front of your phone instead. It works in a similar way to other glasses-less lenticular screens, but uses the phone’s front camera to see where your eyes are and adjust the 3D effect accordingly. Previous attempts at glasses-less 3D viewing through lenticular screens required you to sit in a particular place; the Holoframe uses the phone’s processing to adjust the image, rather than you needing to adjust your seat. If you want this, you’ll need to buy the model that matches your phone. Only a handful of the latest handsets are supported.

It works, but the 3D effect was overall unsatisfying, I felt.

In fact, I preferred the stereo separation and depth offered with the included clip-on 3D viewing glasses, which work with any phone.

Insta360 Evo comes with functional pair of clip on 3D viewing glasses for your phone

Moreover, use of the Holoframe requires a scene to be processed before you can watch it. The processing time depends on the length of the clip, but even a relatively short clip will take a minute or so. And if you move your eyes, the app will need to “capture” where they are before you can resume watching. It just felt like far more effort than it was worth. The clip-on glasses could be used without any additional processing time: it’s just a generic side-by-side 3D output.

Should You Buy an Insta360 EVO?

The main attraction of the EVO is the ability to shoot for VR. If you’re not sure you even want to do that, and are primarily interested in the 360-degree features, go for the OneX model instead. You’ll get better quality stitching, a removable battery, and a few other features like the ability to shoot bullet-time that aren’t found on this device. Consider the EVO mainly for VR video production, with 360 features as a little bonus.

The hardware isn’t perfect. The non-removable battery and flimsy plastic clips are annoying, but not enough to detract from the overall fantastic package on offer here. Finally, it’s feasible for everyone to produce good quality VR video content.

Insta360 Evo: Now Anyone Can Make Movies for VR insta360 evo 2 670x347

Just don’t bother with the Holoframe. The included clip-on glasses are fine for previews on your phone. For the ultimate live VR preview, put on your Oculus Go or Quest!


Enter the Competition!

Insta360 EVO VR180/360 Convertible Camera Giveaway


[ad_2]

Source link

X-Gimp 2.10.10 [rev25] | Software Downloads

[ad_1]

Portable version of the free image editor which offers a real alternative to the likes of Photoshop

Image editors are ten-a-penny nowadays, so anything which wants attention from a divided audience needs to offer something quite special. X-Gimp is the portable version of GIMP (or the GNU Image Manipulation Program), which is one of the most powerful free image editors available and is frequently described as being a free alternative to the likes of Photoshop.


This is a highly versatile tool which can be used as a basic drawing program but can also be employed to edit digital photographs to a professional level. Despite being free of charge, opting to use GIMP does not mean having to compromise on features. Layers, masks, channels, filters and special effects, in addition to the usual range of editing tools, are all on hand to make image editing as easy as possible.


Powerful tools such as the correction mode which allows for the correction of barrel distortion and perspective problems are usually only found in expensive packages but are included here for anyone to try out. Whether you are an amateur digital photographer or a professional graphic artist, GIMP has something to offer you.


Anyone who has tried the program in the past will be pleased to see that GIMP is now a single file installation - there is no longer any need to install special libraries in advance. The program interface may take a little getting used to for some, featuring various floating panels rather than a single program window, but after this shallow learning curve, the program becomes a joy to use.


Note that this is X-Gimp which is the portable version of GIMP.


What's new in rev25?


- Added management of Ghostscript 32 and 64 bit
- Added creation of new profile folders
- Added management of gegl-0.4, babl-0.1 and GIMP in $ LocalAppData $


[ad_2]

Source link

Joplin: The True Open Source Evernote Alternative

[ad_1]

Brief: Joplin is an open source note taking and to-do application. You can organize notes into notebooks and tag them. Joplin also provides a web-clipper to save articles from the internet.

Joplin: Open source note organizer

Joplin Logo

If you like Evernote, you won’t be too uncomfortable with the open source software, Joplin.

Joplin is an excellent open source note taking application with plenty of features. You can take notes, make to-do list and sync your notes across devices by linking it with cloud services like Dropbox and NextCloud. The synchronization is protected with end to end encryption.

Joplin also has a web clipper that allows you to save webpages as notes. The web clipper is available for Firefox and Chrome/Chromium browsers.

Joplin makes the switch from Evernote easier by allowing importing Evernote files in Enex format.

Since you own the data, you can export all your files either in Joplin format or in the raw format.

Features of Joplin

Joplin Featured

Here’s a list of all the features Joplin provides:

  • Save notes into notebooks and sub-notebooks for better organization
  • Create to-do list
  • Notes can be tagged and searched
  • Offline first, so the entire data is always available on the device even without an internet connection
  • Markdown notes with pictures, math notation and checkboxes support
  • File attachment support
  • Application available for desktop, mobile and terminal (CLI)
  • Web Clipper for Firefox and Chrome
  • End To End Encryption
  • Keeps note history
  • Notes sorting based on name, time etc
  • Synchronisation with various cloud services like Nextcloud, Dropbox, WebDAV and OneDrive
  • Import files from Evernote
  • Export JEX files (Joplin Export format) and raw files.
  • Support notes, to-dos, tags and notebooks.
  • Goto Anything feature.
  • Support for notifications in mobile and desktop applications.
  • Geo-location support.
  • Supports multiple languages
  • External editor support – open notes in your favorite external editor with one click in Joplin.

Recommended Read:

Installing Joplin on Linux and other platforms

Joplin app in Ubuntu

Joplin is a cross-platform application available for Linux, macOS and Windows. On the mobile, you can get the APK file to install it on Android and Android-based ROMs. You can also get it from the Google Play store.

For Linux, you can use AppImage file for Joplin and run the application as an executable. You’ll have to give execute permission to the downloaded file.

Experiencing Joplin

Notes in Joplin use markdown but you don’t have to know markdown notations to use it. The editor has a top panel that lets you graphically choose the bullet points, headings, images, link etc.

Though Joplin provides many interesting features, you have to fiddle around on your own to check things out. For example, the web clipper is not enabled by default and I had to figure out how to do it.

You have to enable the clipper from the desktop application. From the top menu, go to Tools->Options. You’ll find the Web Clipper option here:

Joplin Web Clipper
Enable Web Clipper from the desktop application first

The web clipper is not as smart as Evernote’s web clipper that allows to clip portion of a web article graphically. However, you still have good enough options here.

It is an open source software under active development and I do hope that it gets more improvement over the time.

Conclusion

If you are looking for a good note taking application with web-clipper feature, do give Joplin a try. And if you like it and would continue using, try to help Joplin development by making a donation or improving its code and documentation. I made a sweet little donation of 25 Euro on behalf of It’s FOSS.

If you have used Joplin in the past or still using it, how’s your experience with it? If you use some other note taking application, would you switch to Joplin? Feel free to share your views.


[ad_2]

Source link

Yoast SEO Premium v12.9.1 Nulled+Extensions

[ad_1]


Yoast SEO Premium v11.0 Nulled – a fresh edition collection of premium plugin SEO optimizations for WordPress. Sourcing Consolation: Yoast Local SEO for WooCommerce, Yoast Local SEO for WordPress, Yoast News for WordPress & Google, Yoast SEO P remium, Yoast Video SEO for WordPress, Yoast WooCommerce SEO plugin.


Addons:


Yoast SEO: News v12.9.1
Yoast SEO: Local v12.9.1
Yoast SEO: WooCommerce v12.9.1
Yoast SEO: Video v12.9.1


[ad_2]

Source link

3 Notable Hearing Loss Solutions We Found at CES 2020

[ad_1]


Affiliate Disclosure: By buying the products we recommend, you help keep the site alive. Read more.


Advertisement


As we age, our basic senses continuously degrade. Hearing loss is one of the more debilitating and less easily treatable disabilities and it’s not just affecting the elderly. According to the WHO, over a billion people between the ages of 12-35 are at risk of hearing loss due to recreational noise exposure.

Many companies have released products to address hearing loss and we went to see a few of them at CES.

1. AudioCardio: A Workout for Your Ears

AudoCardio Sound Therapy mobile phone app.

AudioCardio’s co-founder Chris Ellis told us that he had to watch his grandfather go from hearing loss to social isolation and dementia before he passed away. This story highlights the heartbreaking consequences of losing your hearing as you age. Together with his partner, who has a background in music production and has done research on how the brain processes sound, Chris founded AudioCardio to prevent and potentially reverse hearing loss using sound therapy.

All you need to start the therapy is AudioCardio’s app (iOS, Android version expected this month) and a pair of headphones. In the initial assessment, the mobile app measures your hearing abilities and determines which decibel levels you’re able to perceive. During your daily 30 to 60 minutes sound therapy sessions, you will listen to your own music, podcasts, or audio books. You will need to retake the assessment once a week and you should see improvements after as little as two weeks.

AudioCardio’s sound therapy has not been approved by the FDA, yet, but several studies and preliminary clinical trials show that their technology can restore up to 10dB of lost hearing. They are seeking FDA approval, which can take several years. Meanwhile, you can use their subscription service at $15 per month or $100 per year.

2. Eargo Neo HiFi: The Invisible Hearing Aid

The stigma of wearing a hearing aid


How Do Hearing Aids Work? A Simple Overview


How Do Hearing Aids Work? A Simple Overview

If you think hearing aids are nothing more than audio amplifiers, you'll be surprised to know that you're wrong. Here's how this magical bit of technology actually works!
Read More

prevents many young people from seeking treatment. Eargo’s emphasis is on producing tiny hearing aids that are virtually invisible. At CES 2020, they announced the fourth generation of their hearing loss solution.

The Eargo Neo HiFi fits snuck and comfortably into any ear. A transparent pull-cord ensures that you can easily remove the hearing aid, but it’s shaped so that it remains invisible when you’re wearing it.

Eargo Neo HiFi invisible hearing aid in their charging case.

Setting up the Eargo Neo HiFi does not require a hearing test. Instead, it comes with three presets for mild, medium, severe hearing loss.

Until March 31, 2020, you can buy the Eargo Neo HiFi at the introductory price of $2,650. After that, they will be $2,950. The company does offer monthly financing. These hearing aids come with a 45-day money back guarantee, two-year warranty, and lifetime support.

3. OrCam Hear: Solving the Cocktail Party Effect

Conventional hearing aids struggle with isolating voices. In a busy environment, people wearing a hearing aid find it nearly impossible to follow a conversation as all the voices melt together; this is known as the cocktail party effect.

The OrCam Hear is an AI-driven solution


OrCam Hear: The Cocktail Party Effect Solved


OrCam Hear: The Cocktail Party Effect Solved

The OrCam Hear is an assistive device that can single out voices and transmit them to a Bluetooth hearing aid.
Read More

that solves this dilemma by identifying lip movements and body gestures of a speaker. As the wearer of the device physically directs their attention to another speaker, the OrCam Hear can seamlessly switch to the new voice. The OrCam Hear is an add-on device that pairs to your hearing aid using Bluetooth.

The OrCam Hear is not available for retail, yet.

Bonus: Puro Sound Labs PuroPro

For young people, recreational noise exposure is the biggest contributor to early hearing loss. Puro Sound Labs has been addressing this issue with headphones for kids, limited to a safe volume of 85dB. At CES 2020, they announced a new line of headphones for adults, the PuroPro.

Puro Sound Labs PuroPro Bluetooth headphones for adults with ANC.

The PuroPro Bluetooth headphones feature two-stage active noise cancelling of 22-32dB. To further accommodate noisy environments, the PuroPro permits a maximum volume of 95dB, though you should not exceed this volume for more than 50 minutes a day.

The PuroPro will be available in late Q1 2020 for $199.99.

Don’t Let Hearing Loss Get You (Down)

As long as you’re not affected by significant hearing loss, you should seriously consider limiting your noise exposure. But keep in mind that hearing peaks at age 25 and declines as we age. Training your sense of hearing could slow down this decline. And if your hearing loss has progressed too far, smart hearing aids can artificially restore your hearing to some degree.

We have previously reviewed Nura’s Nuraphone headphones


The Nuraphone: Gimmick or Gamechanger? (Review and Giveaway!)


The Nuraphone: Gimmick or Gamechanger? (Review and Giveaway!)

Fully personalized sound, premium build quality, and loaded with cutting edge technology the Nuraphones may change the way you see audio.
Read More

, which personalize sound to your ears and hearing abilities.


[ad_2]

Source link

الأحد، 26 يناير 2020

How to Recover Your PC Using an Android Device

[ad_1]


Affiliate Disclosure: By buying the products we recommend, you help keep the site alive. Read more.


Advertisement

Your PC’s operating system crashed, and the only chance of recovery is an ISO file flashed to a USB stick.

But if you don’t have a spare PC to create installation media with, don’t worry. Android has you covered. Here’s how to recover your system by creating a bootable USB from Android without a PC.

Your PC Is Toast: What Now?

We’ve all been there: your PC won’t load. Perhaps a virus has compromised the operating system, or the hard disk is failing and needs replacing. There’s data you need to recover, but you have no way to burn a recovery disk.

You may think your PC is the only device you have that can download and burn ISO files (disk images saved as a single file). Or is it?

If you have an Android phone or tablet on hand running Android 3.1 or later, the device probably has USB On-The-Go (OTG) support


What Is USB OTG? 5 Cool Ways to Use It on Android


What Is USB OTG? 5 Cool Ways to Use It on Android

What is USB OTG and how can you use it on Android? We explain the feature and the many ways to utilize it.
Read More

. This means you can attach USB devices to your phone or tablet, like a mouse, keyboard, or even a USB storage device.

This is the path you can use to recover your PC. Download the recovery disk ISO file, connect the USB device to your tablet or phone, and burn the ISO file using a dedicated app.

Using Android Like a PC

If you have an Android phone or tablet nearby with OTG support, there’s a good chance you can use it to fix your PC.

But wait: have you diagnosed the problem? Before proceeding with recovery, search online to check what the boot issue might be. Think about the symptoms, what your PC did before it crashed, and how long you’ve had the problem. Taking this approach will help you to decide what path to take later when burning an ISO.

For instance, you might require a dedicated recovery disk, or simply a fresh version of your preferred operating system. However, if you’re not sure, opt for the recovery disk. If your Android device has enough storage space, find a suitable disk image ISO file and download it. If you’re low on space, try a tiny Linux distro


The 8 Smallest Linux Distros That Are Lightweight and Need Almost No Space


The 8 Smallest Linux Distros That Are Lightweight and Need Almost No Space

Strapped for hard disk space? Install one of these small and lightweight Linux distros to make your PC usable again.
Read More

.

Be sure to use your home network connection for this, rather than mobile internet. Downloading an operating system will use several gigabytes of data, which could eat up your entire mobile allowance.

Create a Bootable USB on Android Without a PC

Once you’ve downloaded the ISO you want, you’ll need a tool to burn it with. On Windows, you would probably choose Rufus, but this is not available for Android. However, several Rufus-like alternatives are available.

Of these, the most reliable is the ISO 2 USB Android utility. This basically does the same job as Rufus, turning a portion of your phone’s storage into a bootable disk.

With this, you can run recovery, or simply install a new operating system.

Download: ISO 2 USB for Android (Free)

Create Bootable ISO Media

To use this, however, you’ll also need an OTG adapter. This is an affordable cable that you can purchase from mobile phone retailers or online. Two types are available: one for phones with USB-C ports, and another for those with micro-USB ports.


USB C to USB Adapter


USB C to USB Adapter

Buy Now On Amazon
$7.99


Micro USB 2.0 OTG Cable


Micro USB 2.0 OTG Cable

Buy Now On Amazon
$5.29

Once connected to your phone, simply plug a USB flash drive into the OTG adapter. You can write your downloaded ISO to this destination.

Begin by connecting the USB drive via the OTG cable, then tapping the first Pick button. Choose your USB drive, then proceed to the second Pick button to choose the ISO file.

Be sure to accept Android’s permissions requests throughout; the app will request access to your media files, as well as the USB drive. With both selected, you can then tap Start to begin writing the data.


It shouldn’t take long to complete; once done, remove the USB device, insert it in your PC, and begin recovery. Remember to change the boot order in your computer’s BIOS


How to Change the Boot Order on Your PC (So You Can Boot From USB)


How to Change the Boot Order on Your PC (So You Can Boot From USB)

Learn how to change the boot order of your computer. It's important for troubleshooting issues and tweaking settings, and it's a lot easier than you think.
Read More

to enable booting from USB.

Turning an Android Phone Into a Bootable Linux Environment

Don’t have a USB flash drive or a USB to OTG cable? If your Android device is rooted, you can try an alternative approach.

DriveDroid is a useful utility that lets you boot your PC directly over a USB cable using any ISO or IMG file stored on your phone. You just need your Android smartphone or tablet and a suitable cable—no flash drives required.

Download: DriveDroid (Free) | DriveDroid Paid ($1.99)

It’s important to note that this is only an option for rooted devices. Even then, some phones may not work as intended due to kernel quirks.

Note also that this solution requires support for USB Mass Storage on your device. While modern versions of Android don’t support USB Mass Storage, DriveDroid’s website notes that “DriveDroid has various methods of enabling Mass Storage.”

How to Recover a PC Using DriveDroid

Run DriveDroid and Grant root permissions. Next, click the Download button, and select an OS to download to your phone. A massive selection is available, from Ubuntu to ZorinOS, Tiny Linux, Gentoo, Arch Linux, and other top Linux distros.

However, if you’re trying to recover your PC, the best options are boot-repair-disk, or CloneZilla if you need to clone the contents of your dying HDD.


Note that when you select an OS, you’re given a choice of version. This is typically a recent build, in 32-bit or 64-bit flavors. Be sure to select the OS that suits the build of the PC you’re attempting to recover.

With the OS selection made, wait while it downloads to your Android device. The ISO file will save in the Downloads folder but will also appear in the main DriveDroid screen. Select the ISO, then wait while the options are displayed. Choose standard USB storage, read-only USB storage, or CD-ROM. This will determine how the ISO behaves when you reboot your computer.

You can then connect the Android device to your PC and reboot. If your computer’s boot order is configured to boot USB devices, the downloaded operating system will boot from your phone. You can then use this to recover your PC, or even install a brand-new OS.

How to Install Windows 10 From an Android Phone to PC

There is another benefit of using the DriveDroid app rather than ISO 2 USB. DriveDroid adds the ability to install Windows 10 from an Android phone or tablet.

So if Linux isn’t ideal for you, and the recovery tools don’t repair your Windows partition, you can simply reinstall. For $1.99, this is a good deal. You could have Windows 10 reinstalled on your PC using your Android phone in under an hour.

That’s not bad for an Android app.

Two Options to Recover Your PC With Android

If your PC is out of action, you can install a new operating system or run a recovery environment thanks to Android. Two solid options are available:

  • ISO 2 USB: Lets you burn an ISO file directly to a USB flash drive over USB-OTG.

  • DriveDroid: Enables you to store bootable ISO files on Android. With the paid version, support for Windows 10 installation images is added.

By now you should have a USB stick or an Android device ready to boot your PC.

Still having trouble? Try another recovery option. If you end up gaining access to a second PC, follow our guide to backing up your data when your computer won’t boot


How to Back Up Data From a Computer That Won't Boot


How to Back Up Data From a Computer That Won't Boot

When your computer won't boot, your data might still there. Here's how to install Linux on a bootable USB flash drive to recover your files. Next time keep a backup though.
Read More

.


[ad_2]

Source link

Ads

Copyright © All Rights Reserved

Designed by: Templatezy / Dreamworkdesign™ / Sb Game Hacker